Zitadel SSO with openZro Self-Hosted (Advanced)
Zitadel is an open-source identity infrastructure platform designed for cloud-native environments. It provides multi-tenancy, customizable branding, passwordless authentication, and supports protocols like OpenID Connect, OAuth2, SAML2, and LDAP.
Zitadel was previously used in the openZro quickstart script. If you have an existing Zitadel deployment, you can continue using it as a standalone IdP or migrate to the embedded IdP with Zitadel as an external IdP directly in the openZro Management Dashboard.
Standalone Setup (Advanced)
This guide wires Zitadel as openZro's only identity provider — Dex is disabled and the management daemon talks directly to Zitadel for both token validation and user lifecycle. Choose this path only if all three apply:
- Zitadel is the source of truth for user lifecycle. You want openZro to call Zitadel's management API to list, invite, and delete users — so deleting a user in openZro removes them from Zitadel too. The recommended setup (Management Setup) only consumes tokens; it cannot write back.
- You need just one IdP, and it's Zitadel. This path doesn't support multiple upstreams — there's no Dex to aggregate them.
- You're willing to give up the bootstrap admin fallback. No embedded local user store. If Zitadel is down or misconfigured, nobody can log into the dashboard.
For everyone else — multi-IdP shops, anyone wanting a static admin fallback, or operators who only need authentication (not user lifecycle writeback) — use the Management Setup (Recommended) in the main Zitadel documentation instead.
If you prefer not to self-host, Zitadel offers a managed cloud option at zitadel.com.
Prerequisites
- Zitadel instance (cloud or self-hosted) with SSL
- Docker and Docker Compose for openZro
Step 1: Create and Configure Zitadel Application
- Navigate to Zitadel console
- Click Projects at the top menu, then click Create New Project
- Fill in:
- Name:
OPENZRO
- Name:
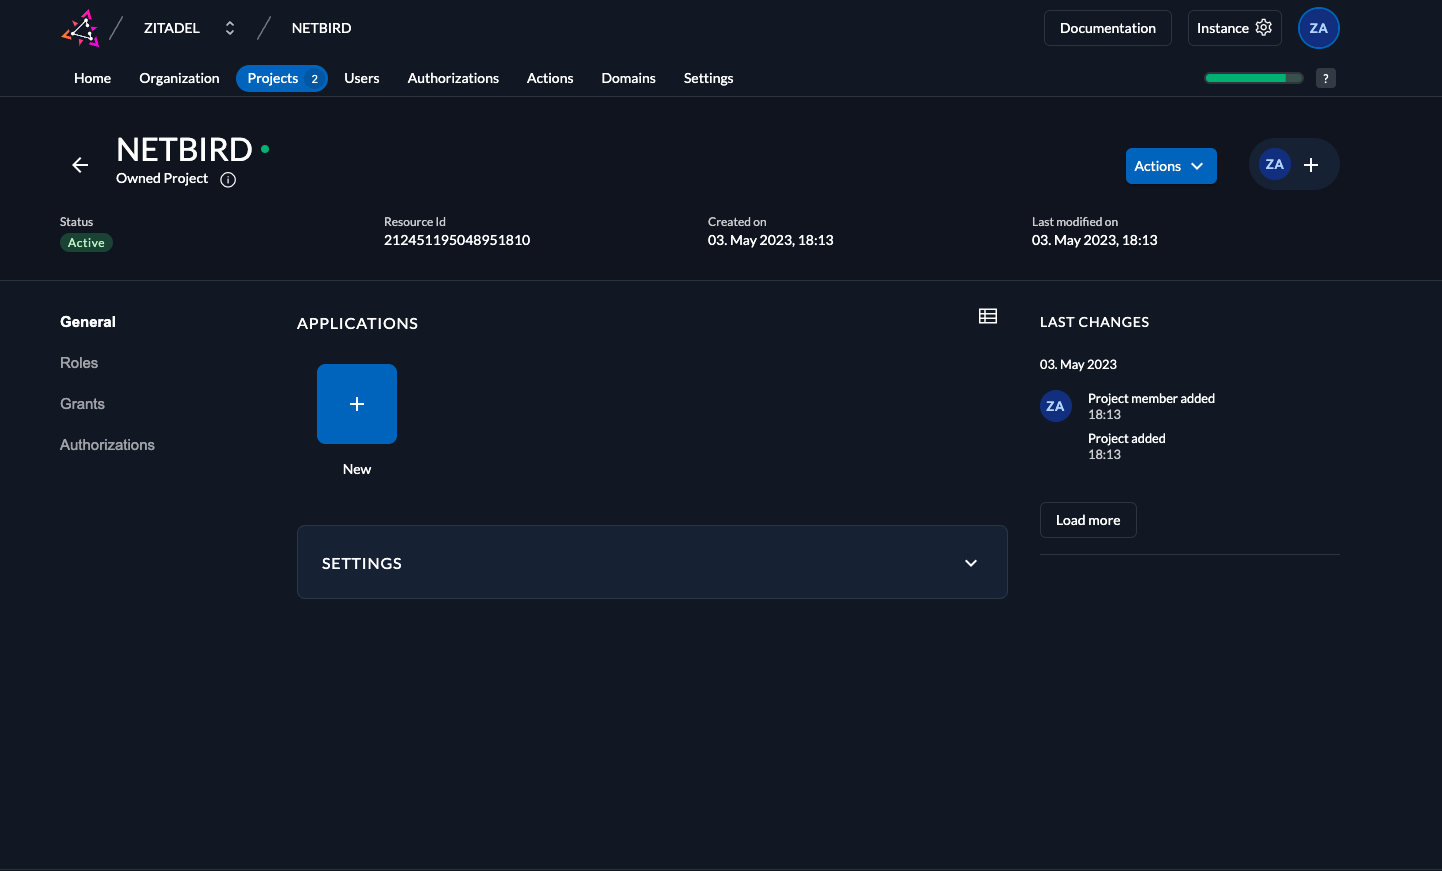
- Click Projects and select OPENZRO project
- Click New in Applications section
- Fill in:
- Name:
openzro - Type of Application:
User Agent
- Name:
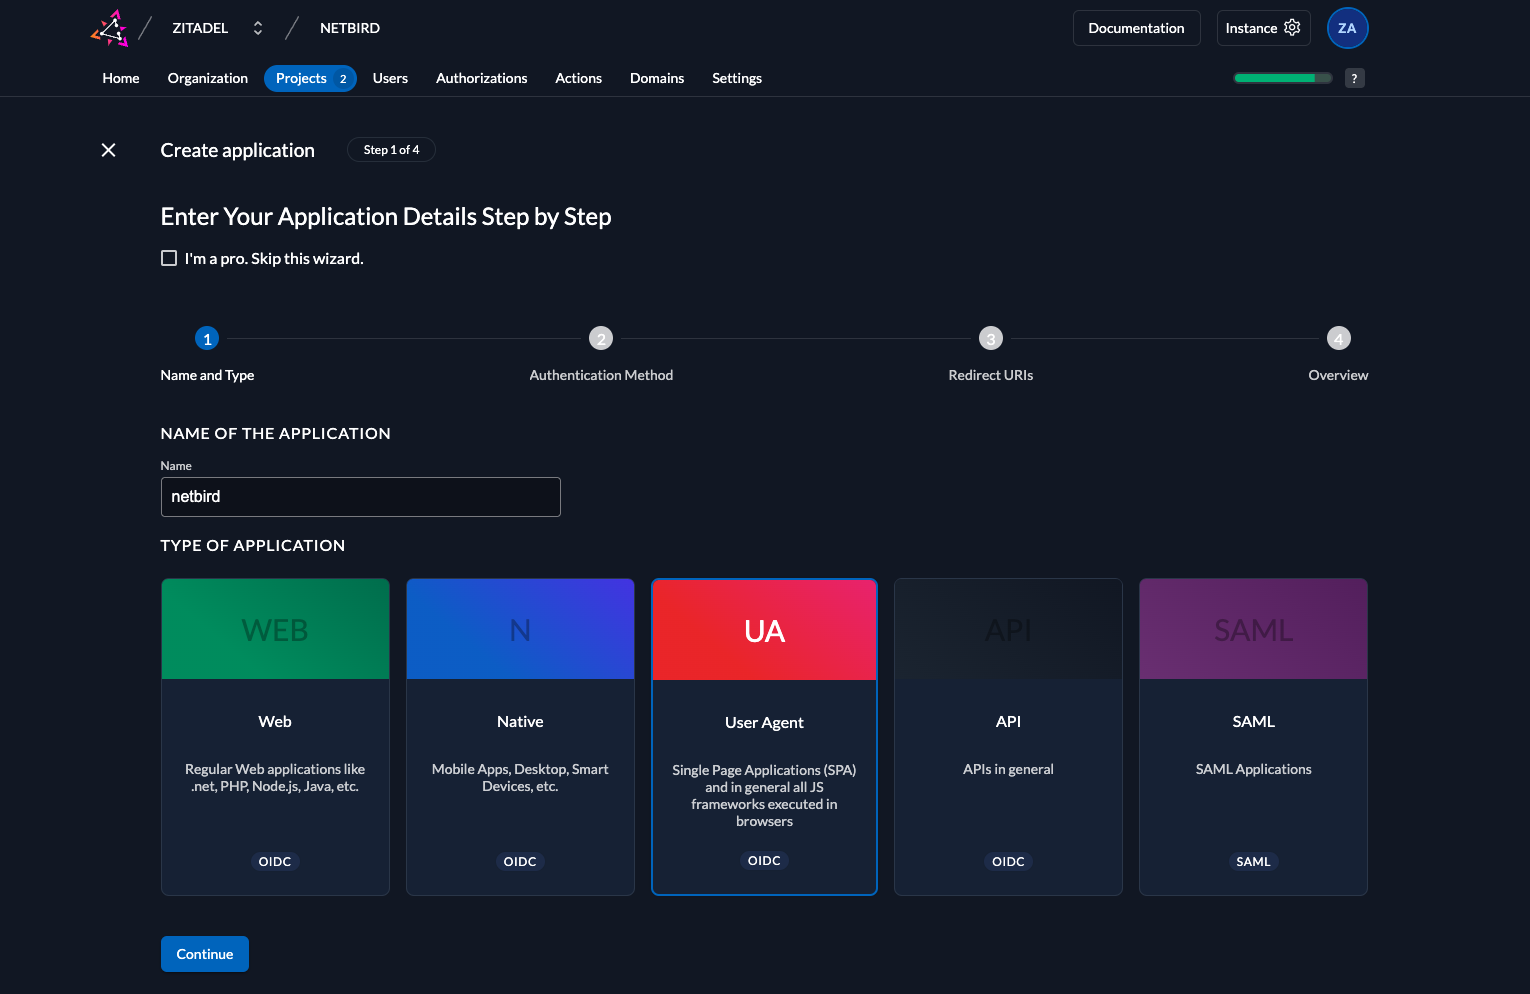
- Click Continue and set:
- Authentication Method:
PKCE
- Authentication Method:
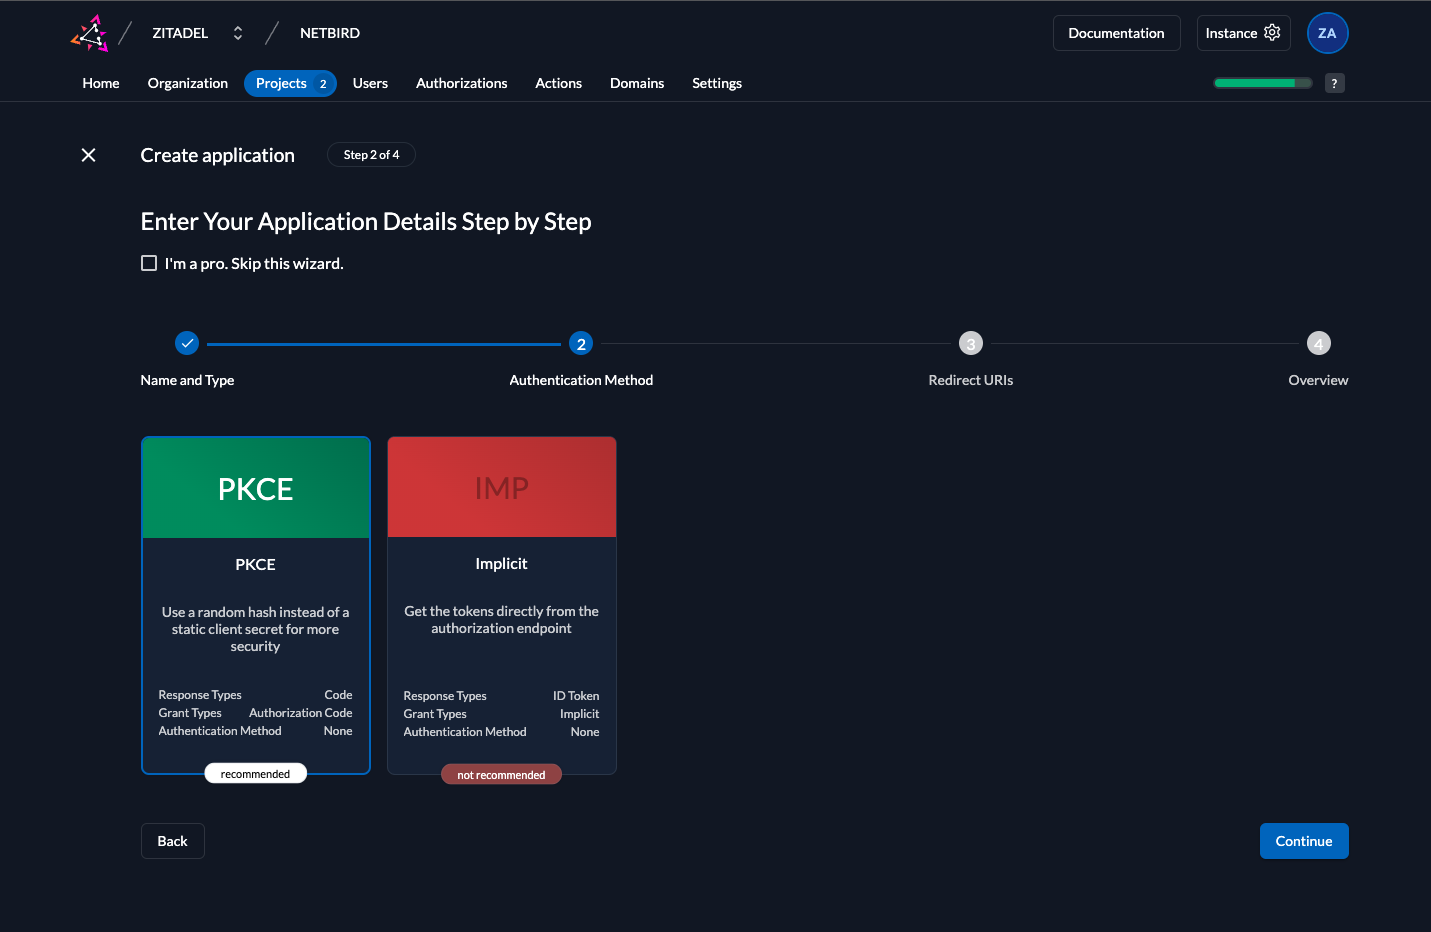
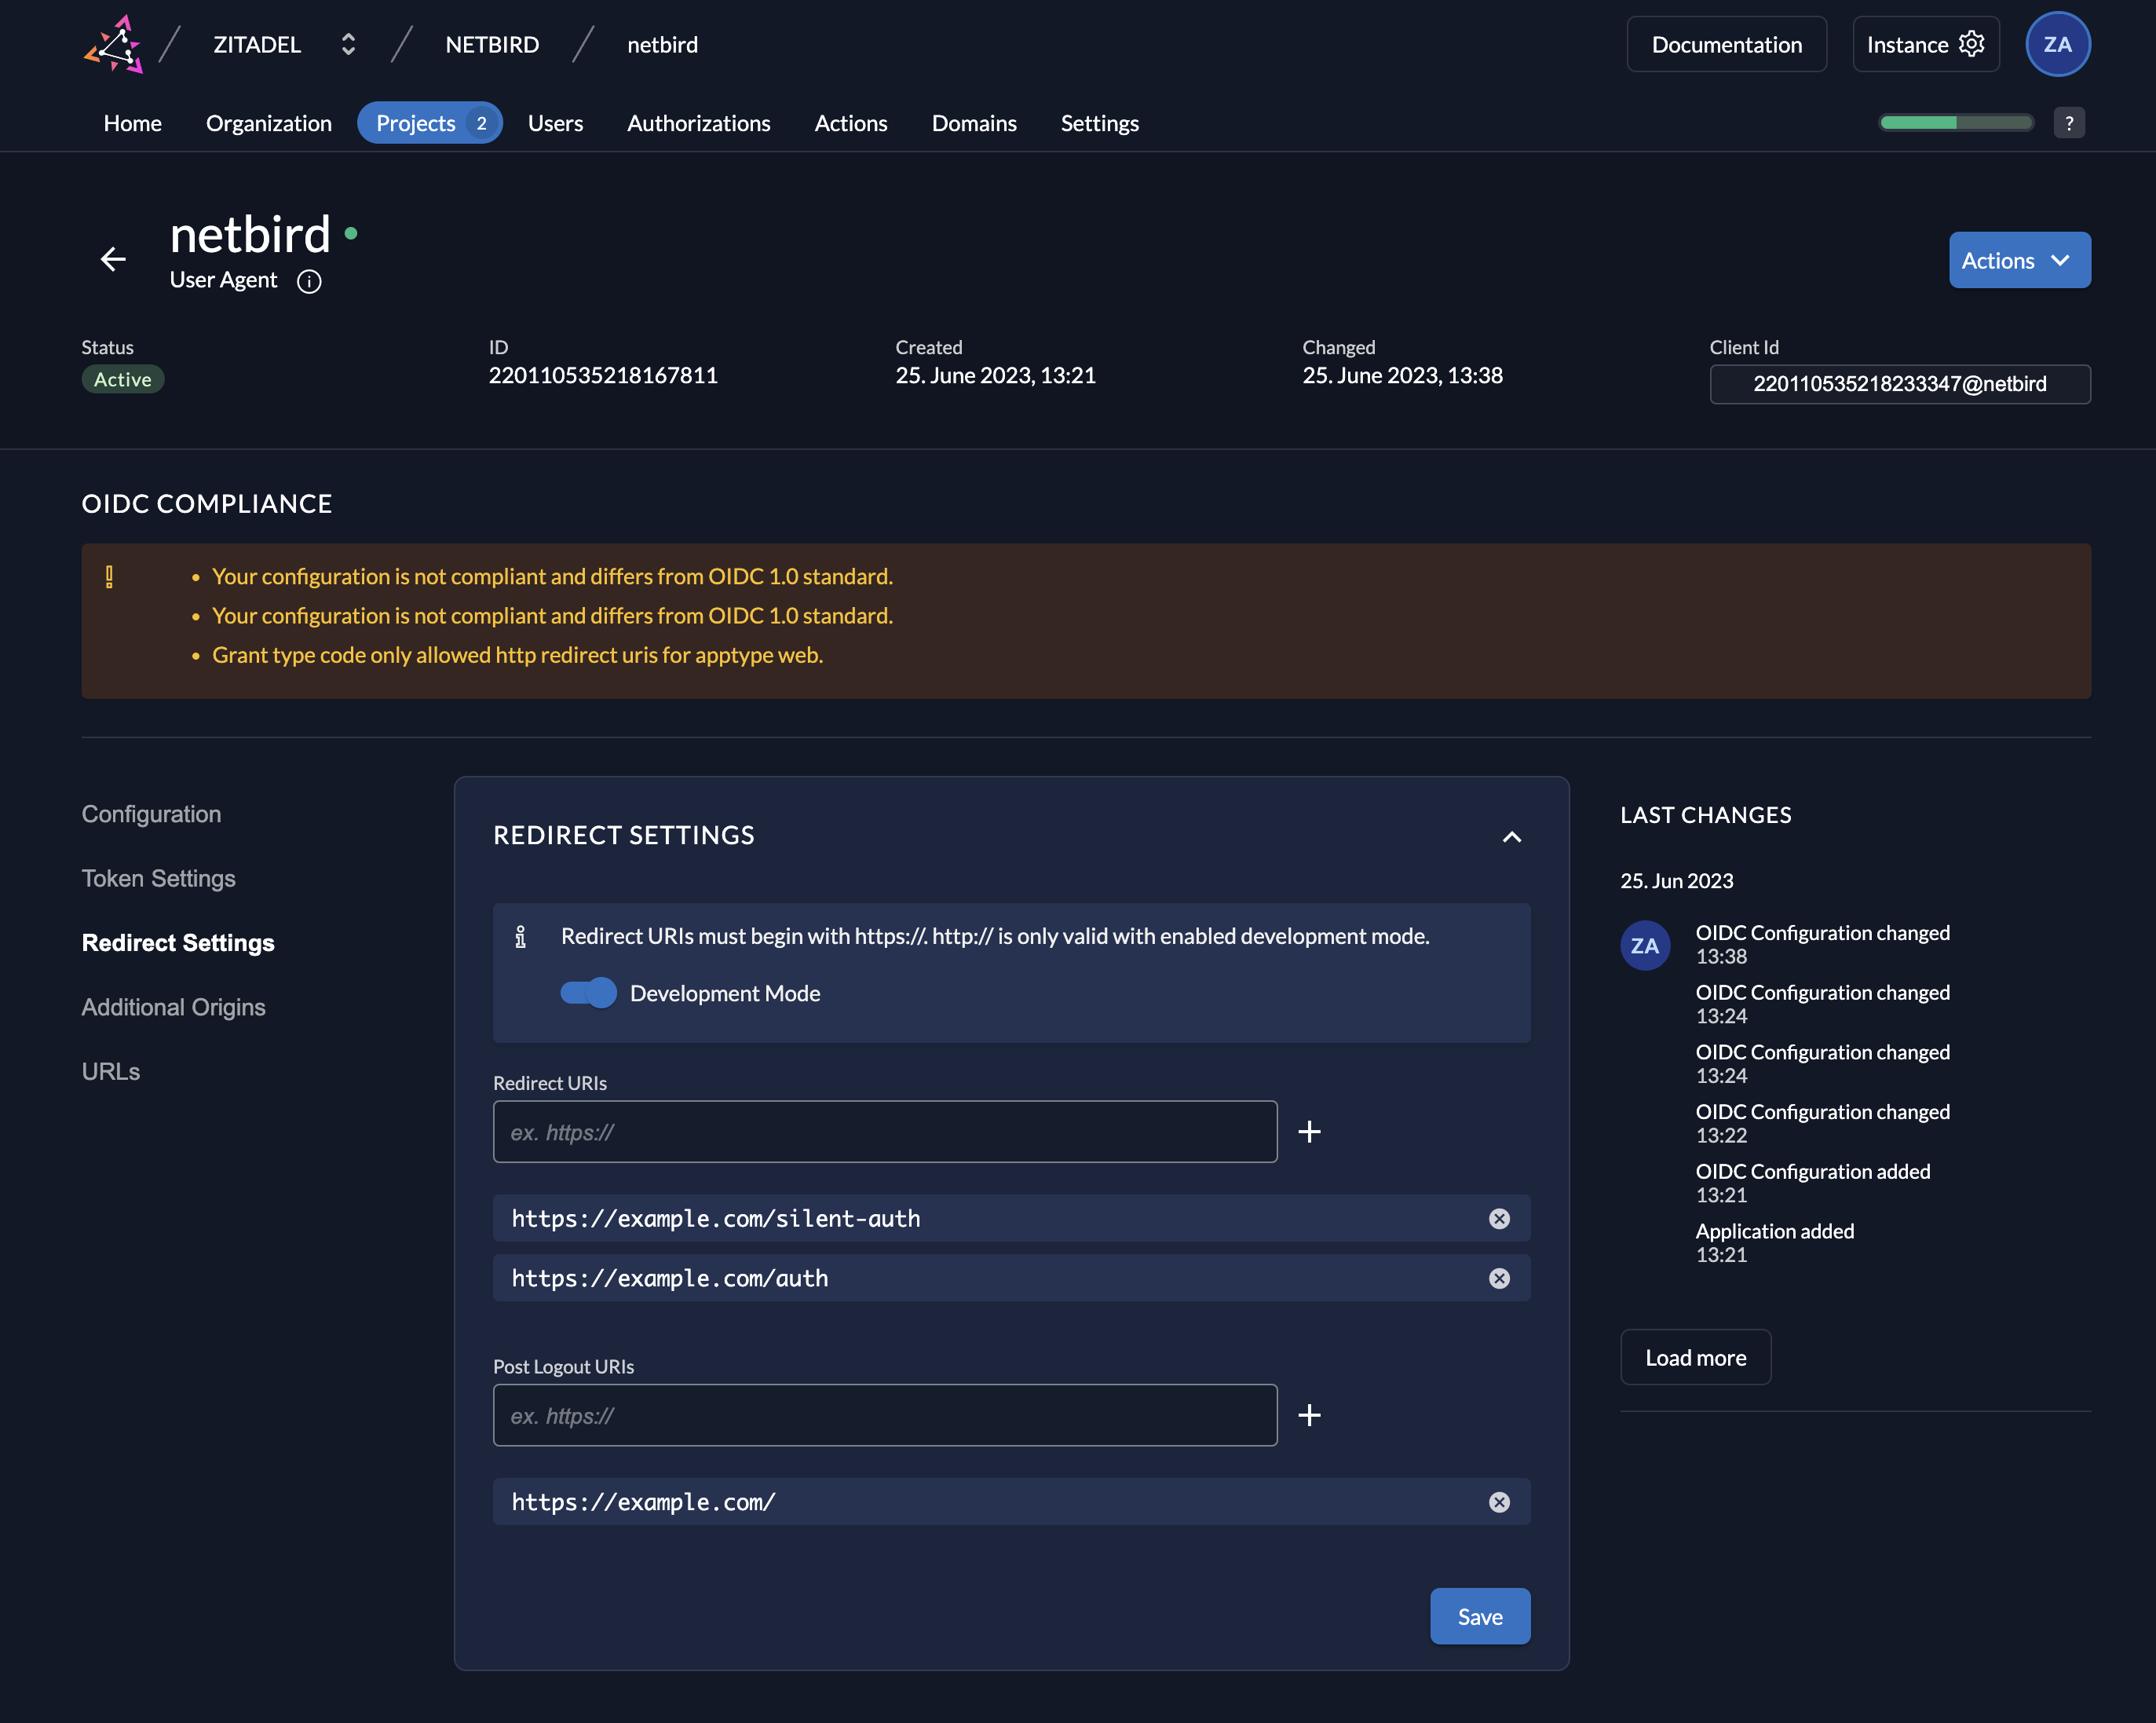
- Click Continue and configure:
- Redirect URIs:
https://<domain>/authhttps://<domain>/silent-authhttp://localhost:53000
- Post Logout URIs:
https://<domain>/
- Redirect URIs:
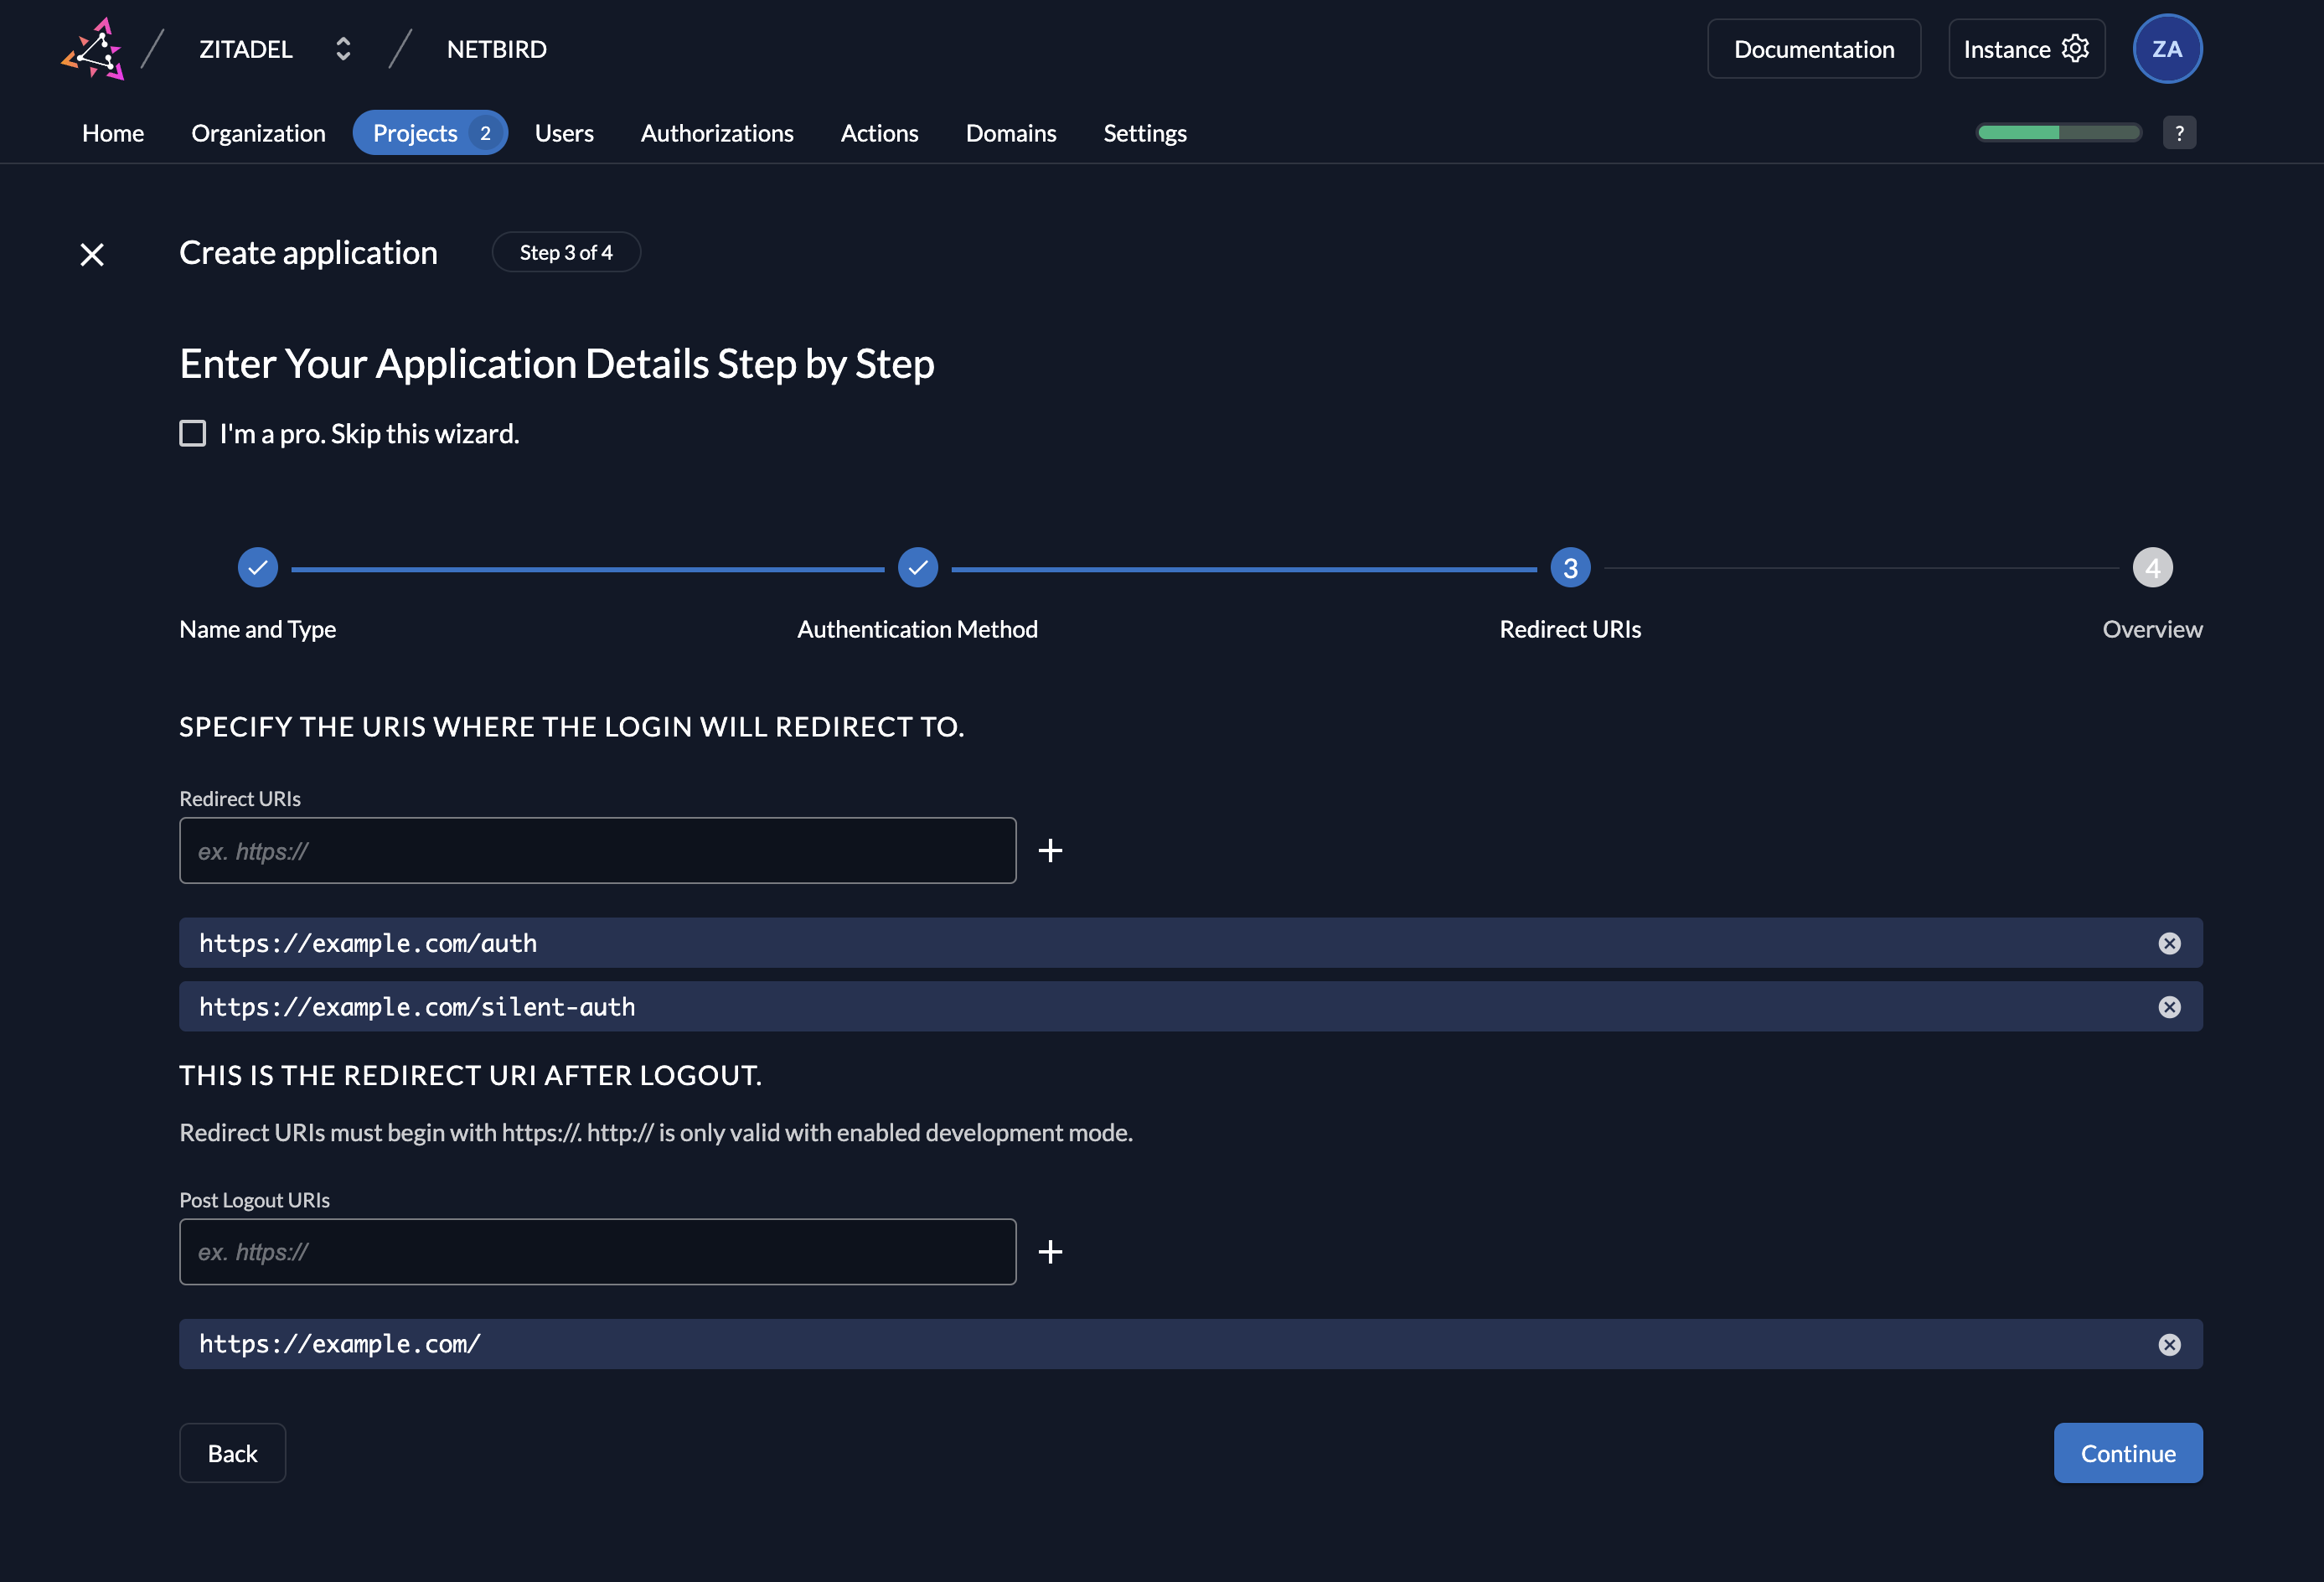
- Click Create and then Close
- Under Grant Types, select
Authorization Code,Device Code, andRefresh Token - Click Save

- Copy Client ID for later use
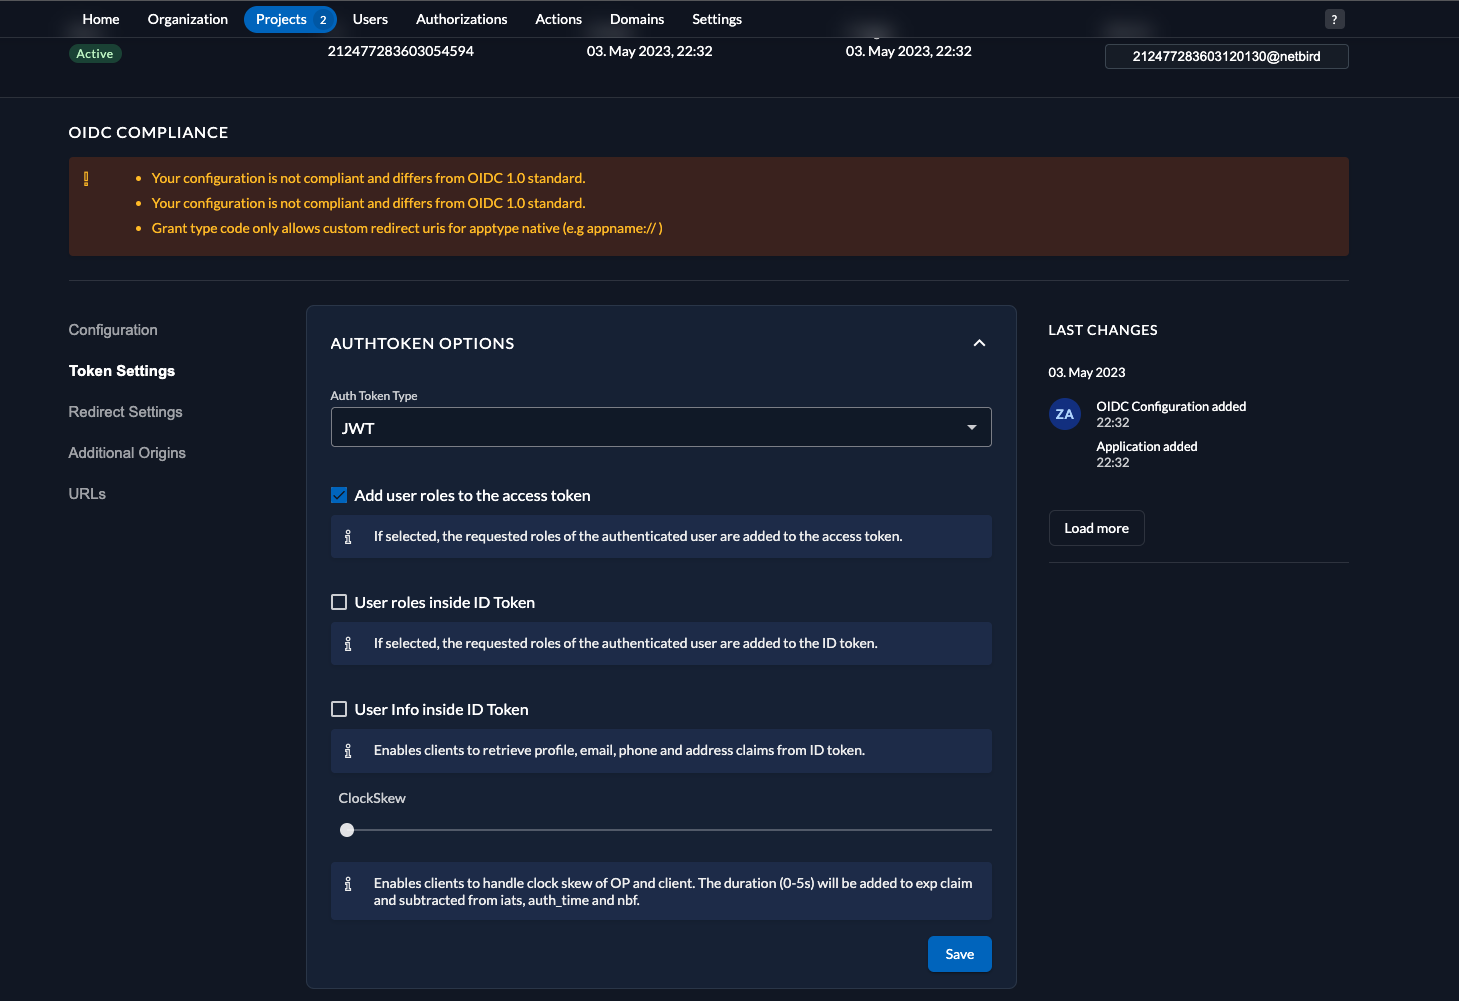
Step 2: Configure Token Settings
- Select the openzro application
- Click Token Settings in the left menu
- Configure:
- Auth Token Type:
JWT - Check Add user roles to the access token
- Auth Token Type:
- Click Save
Step 3: Configure Redirect Settings (Development Only)
This step is only for development mode without SSL.
- Click Redirect Settings in the left menu
- Toggle Development Mode
- Click Save
Step 4: Create Service User
- Click Users in the top menu
- Select Service Users tab
- Click New
- Fill in:
- User Name:
openzro - Name:
openzro - Description:
openZro Service User - Access Token Type:
JWT
- User Name:
- Click Create
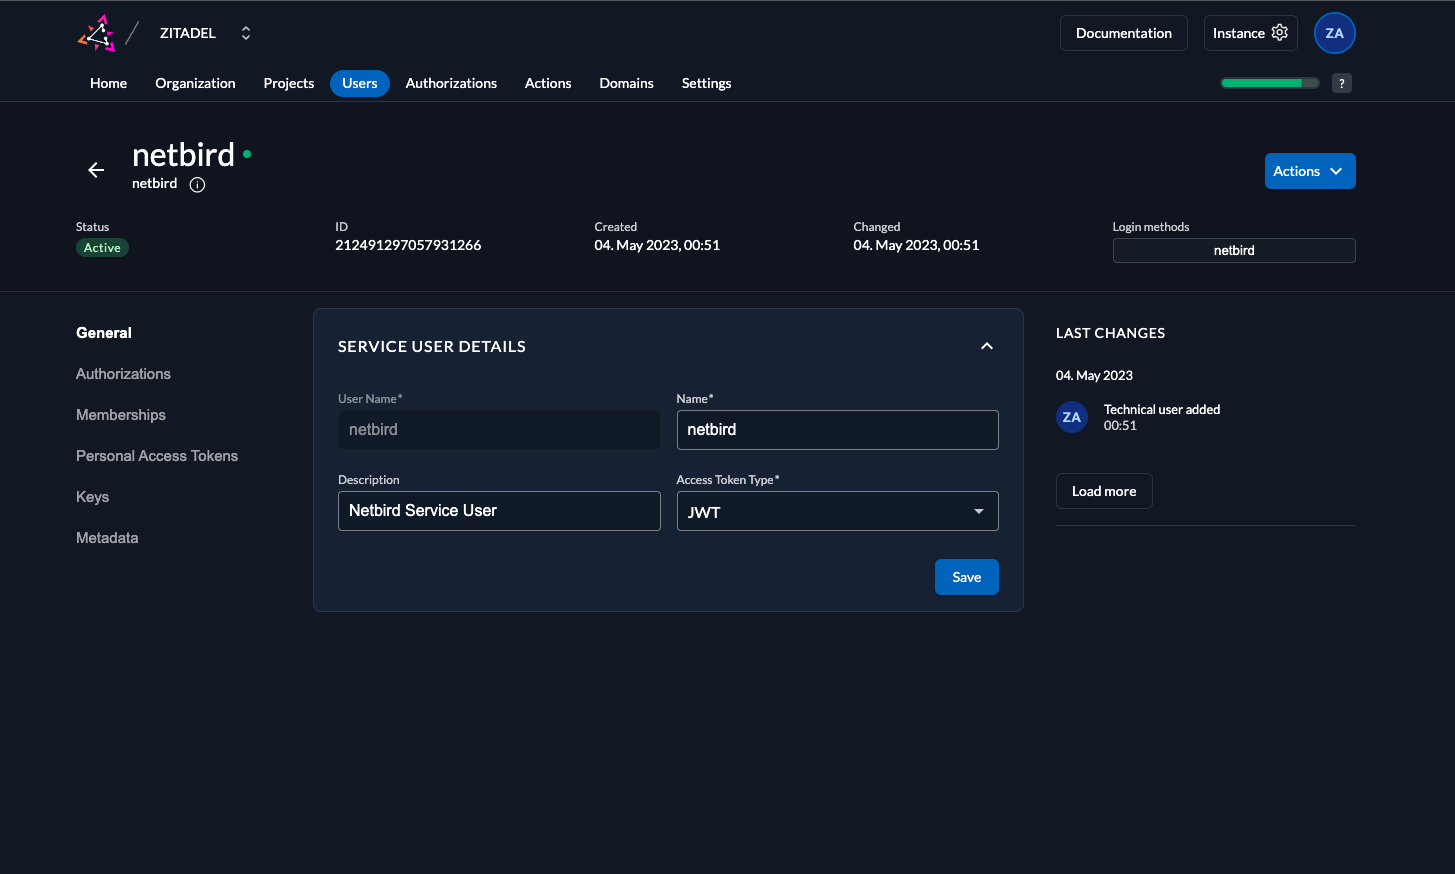
- Click Actions in the top right corner
- Click Generate Client Secret
- Copy ClientSecret for later use

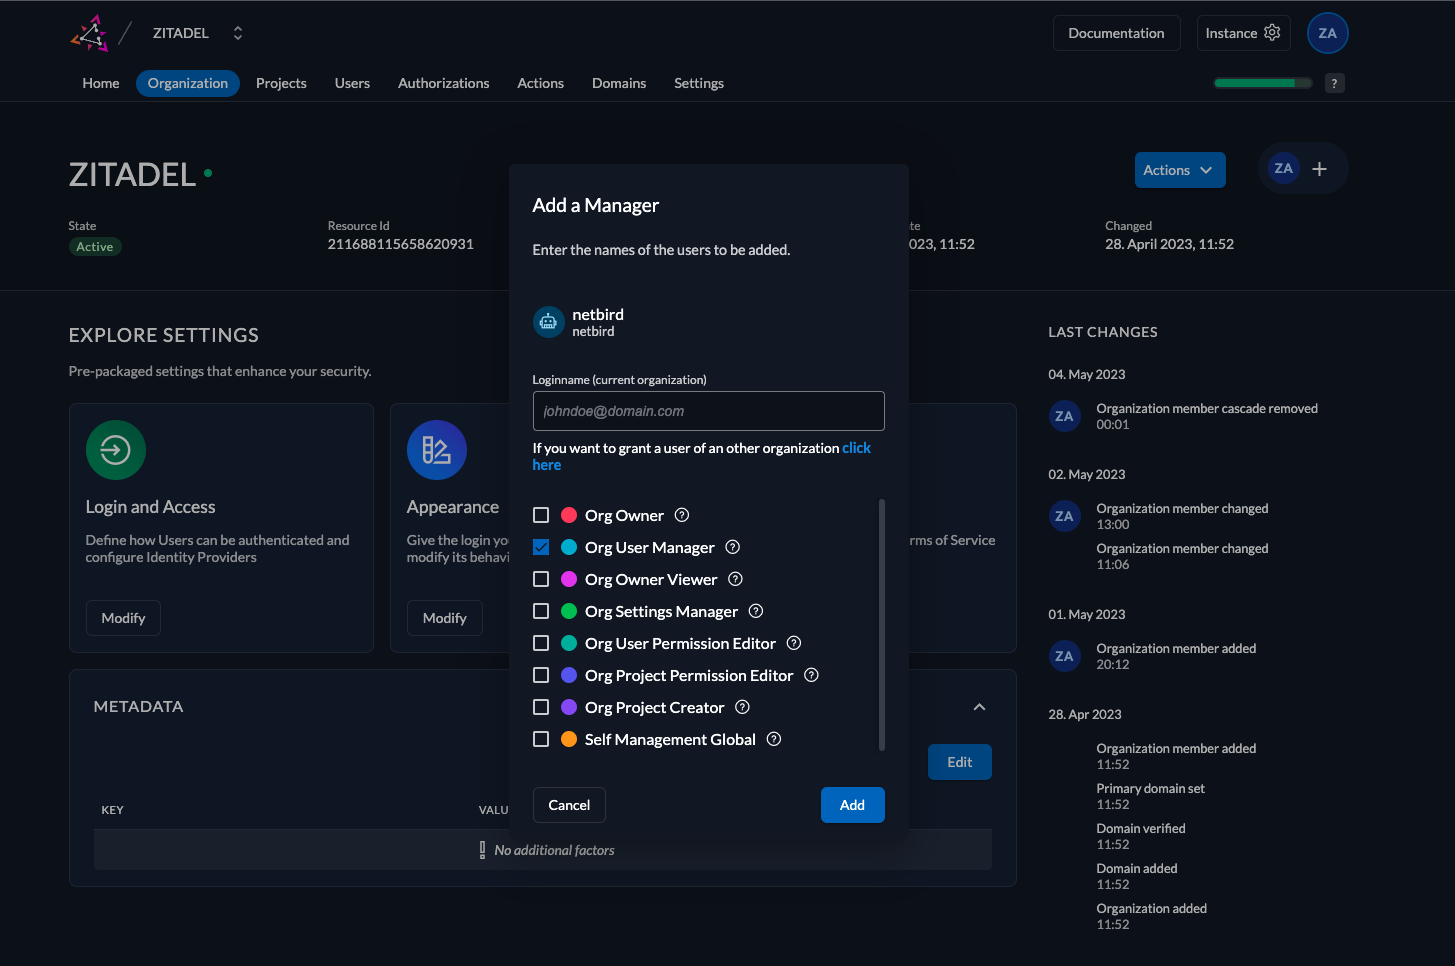
Step 5: Grant User Manager Role
- Click Organization in the top menu
- Click + in the top right corner
- Search for
openzroservice user - Check Org User Manager checkbox
- Click Add
Step 6: Configure openZro
Your authority OIDC configuration will be available at:
https://<YOUR_ZITADEL_HOST_AND_PORT>/.well-known/openid-configuration
Double-check if the endpoint returns a JSON response by calling it from your browser.
Set properties in the setup.env file:
OPENZRO_AUTH_OIDC_CONFIGURATION_ENDPOINT="https://<YOUR_ZITADEL_HOST_AND_PORT>/.well-known/openid-configuration"
OPENZRO_USE_AUTH0=false
OPENZRO_AUTH_CLIENT_ID="<CLIENT_ID>"
OPENZRO_AUTH_SUPPORTED_SCOPES="openid profile email offline_access api"
OPENZRO_AUTH_AUDIENCE="<CLIENT_ID>"
OPENZRO_AUTH_REDIRECT_URI="/auth"
OPENZRO_AUTH_SILENT_REDIRECT_URI="/silent-auth"

OPENZRO_AUTH_DEVICE_AUTH_PROVIDER="hosted"
OPENZRO_AUTH_DEVICE_AUTH_CLIENT_ID="<CLIENT_ID>"
OPENZRO_AUTH_DEVICE_AUTH_AUDIENCE="<CLIENT_ID>"

OPENZRO_MGMT_IDP="zitadel"
OPENZRO_IDP_MGMT_CLIENT_ID="openzro"
OPENZRO_IDP_MGMT_CLIENT_SECRET="<CLIENT_SECRET>"
OPENZRO_IDP_MGMT_EXTRA_MANAGEMENT_ENDPOINT="https://<YOUR_ZITADEL_HOST_AND_PORT>/management/v1"
OPENZRO_MGMT_IDP_SIGNKEY_REFRESH=true
Step 7: Continue with openZro Setup
You've configured all required resources in Zitadel. Continue with the openZro Self-hosting Guide.
Migrating from Zitadel Quickstart
If you deployed openZro using the previous quickstart script with Zitadel:
Option A - Keep using Zitadel standalone: Continue with your existing setup. No changes needed.
Option B - Add Zitadel as external IdP directly in openZro Management Dashboard:
- Deploy new openZro version with embedded IdP
- Add your existing Zitadel as an external IdP directly in the openZro Management Dashboard (follow Management Setup above)
- Users can continue logging in with Zitadel
- Optionally create local user accounts as fallback
Option C - Migrate fully to embedded IdP:
- Export user list from Zitadel
- Deploy new openZro version with embedded IdP
- Recreate users in openZro Dashboard
- Decommission Zitadel when ready
Troubleshooting
"Token validation failed" error
- Verify the issuer URL is correct
- Ensure User Info inside ID Token is enabled
- Check that the audience matches your client ID
Service user authentication fails
- Verify the client secret was copied correctly
- Ensure the service user has Org User Manager role
Device auth not working
- Ensure Device Code grant type is enabled
- Verify PKCE is configured for the application