Keycloak with openZro Self-Hosted
Keycloak is an open-source Identity and Access Management solution maintained by Red Hat. It provides single sign-on, social login, user federation, fine-grained authorization, and supports OpenID Connect, OAuth 2.0, and SAML 2.0 protocols.
Management Setup (Recommended)
Add Keycloak as an external IdP directly in the openZro Management Dashboard. This is the simplest approach and recommended for most deployments.
Prerequisites
- openZro self-hosted with embedded IdP enabled
- Keycloak instance running with SSL
Step 1: Create Realm in Keycloak
- Open the Keycloak Admin Console
- Hover over the realm dropdown in the top-left corner (where it shows
Masteror your current realm) - Click Create Realm
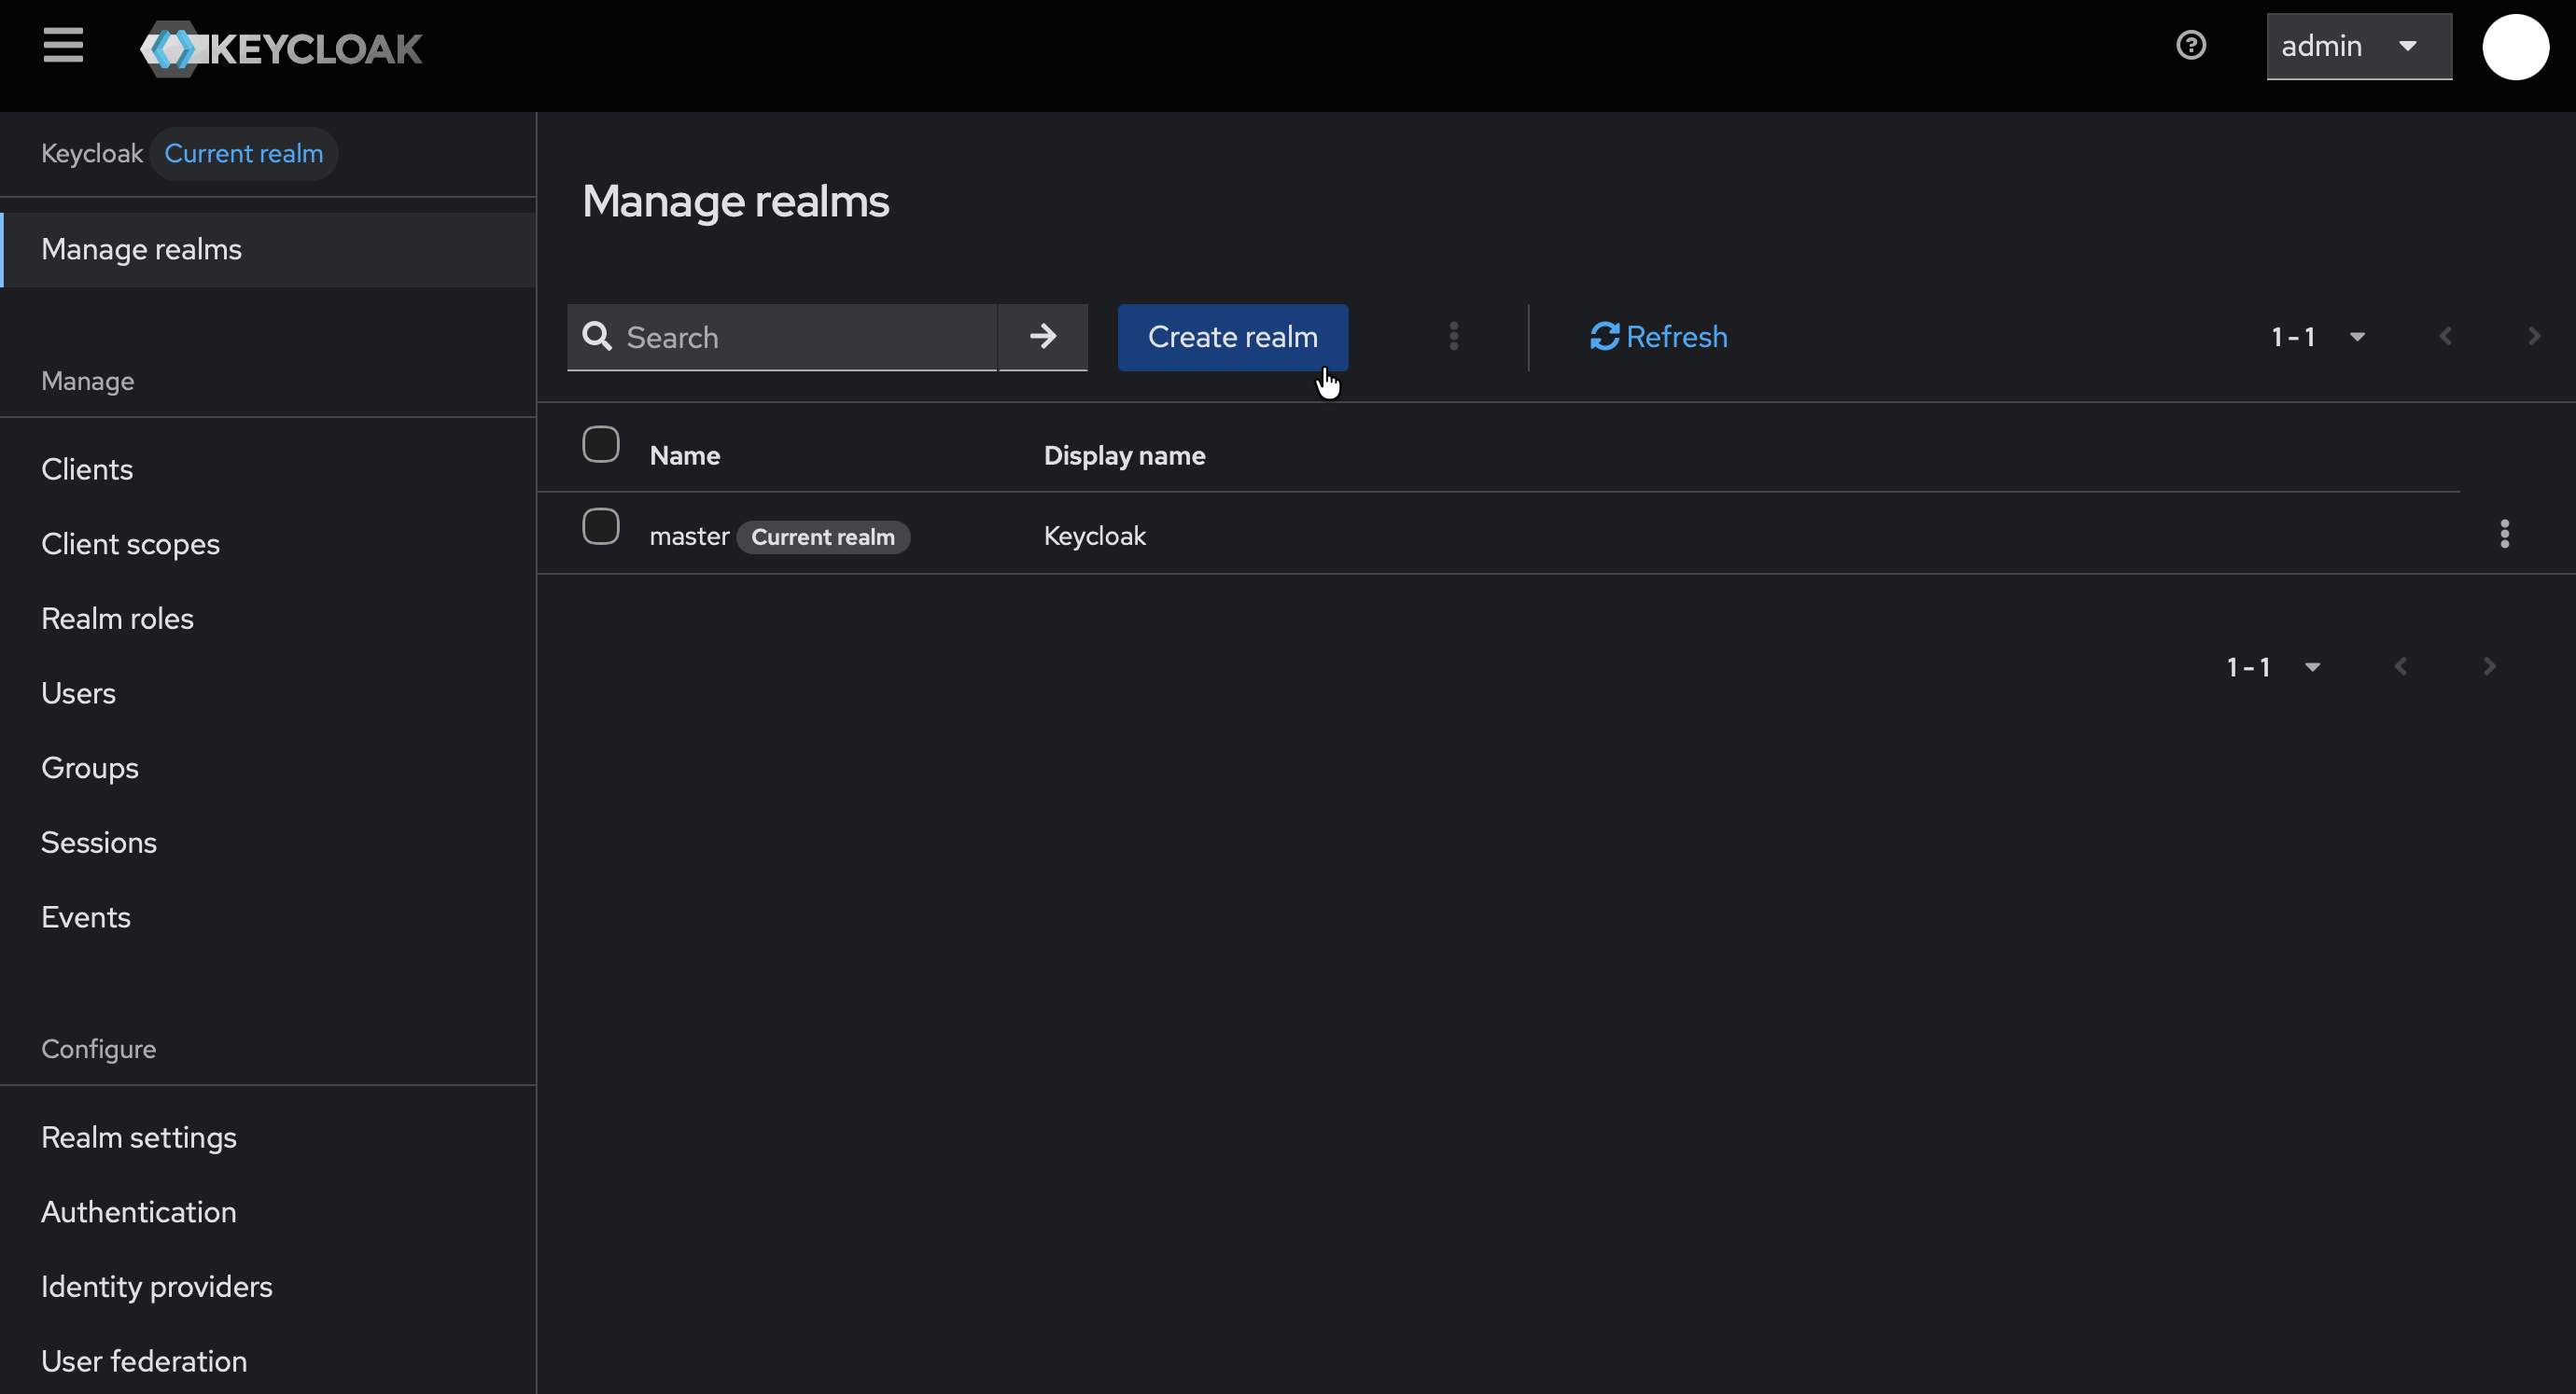
- Fill in:
- Realm name:
openzro
- Realm name:
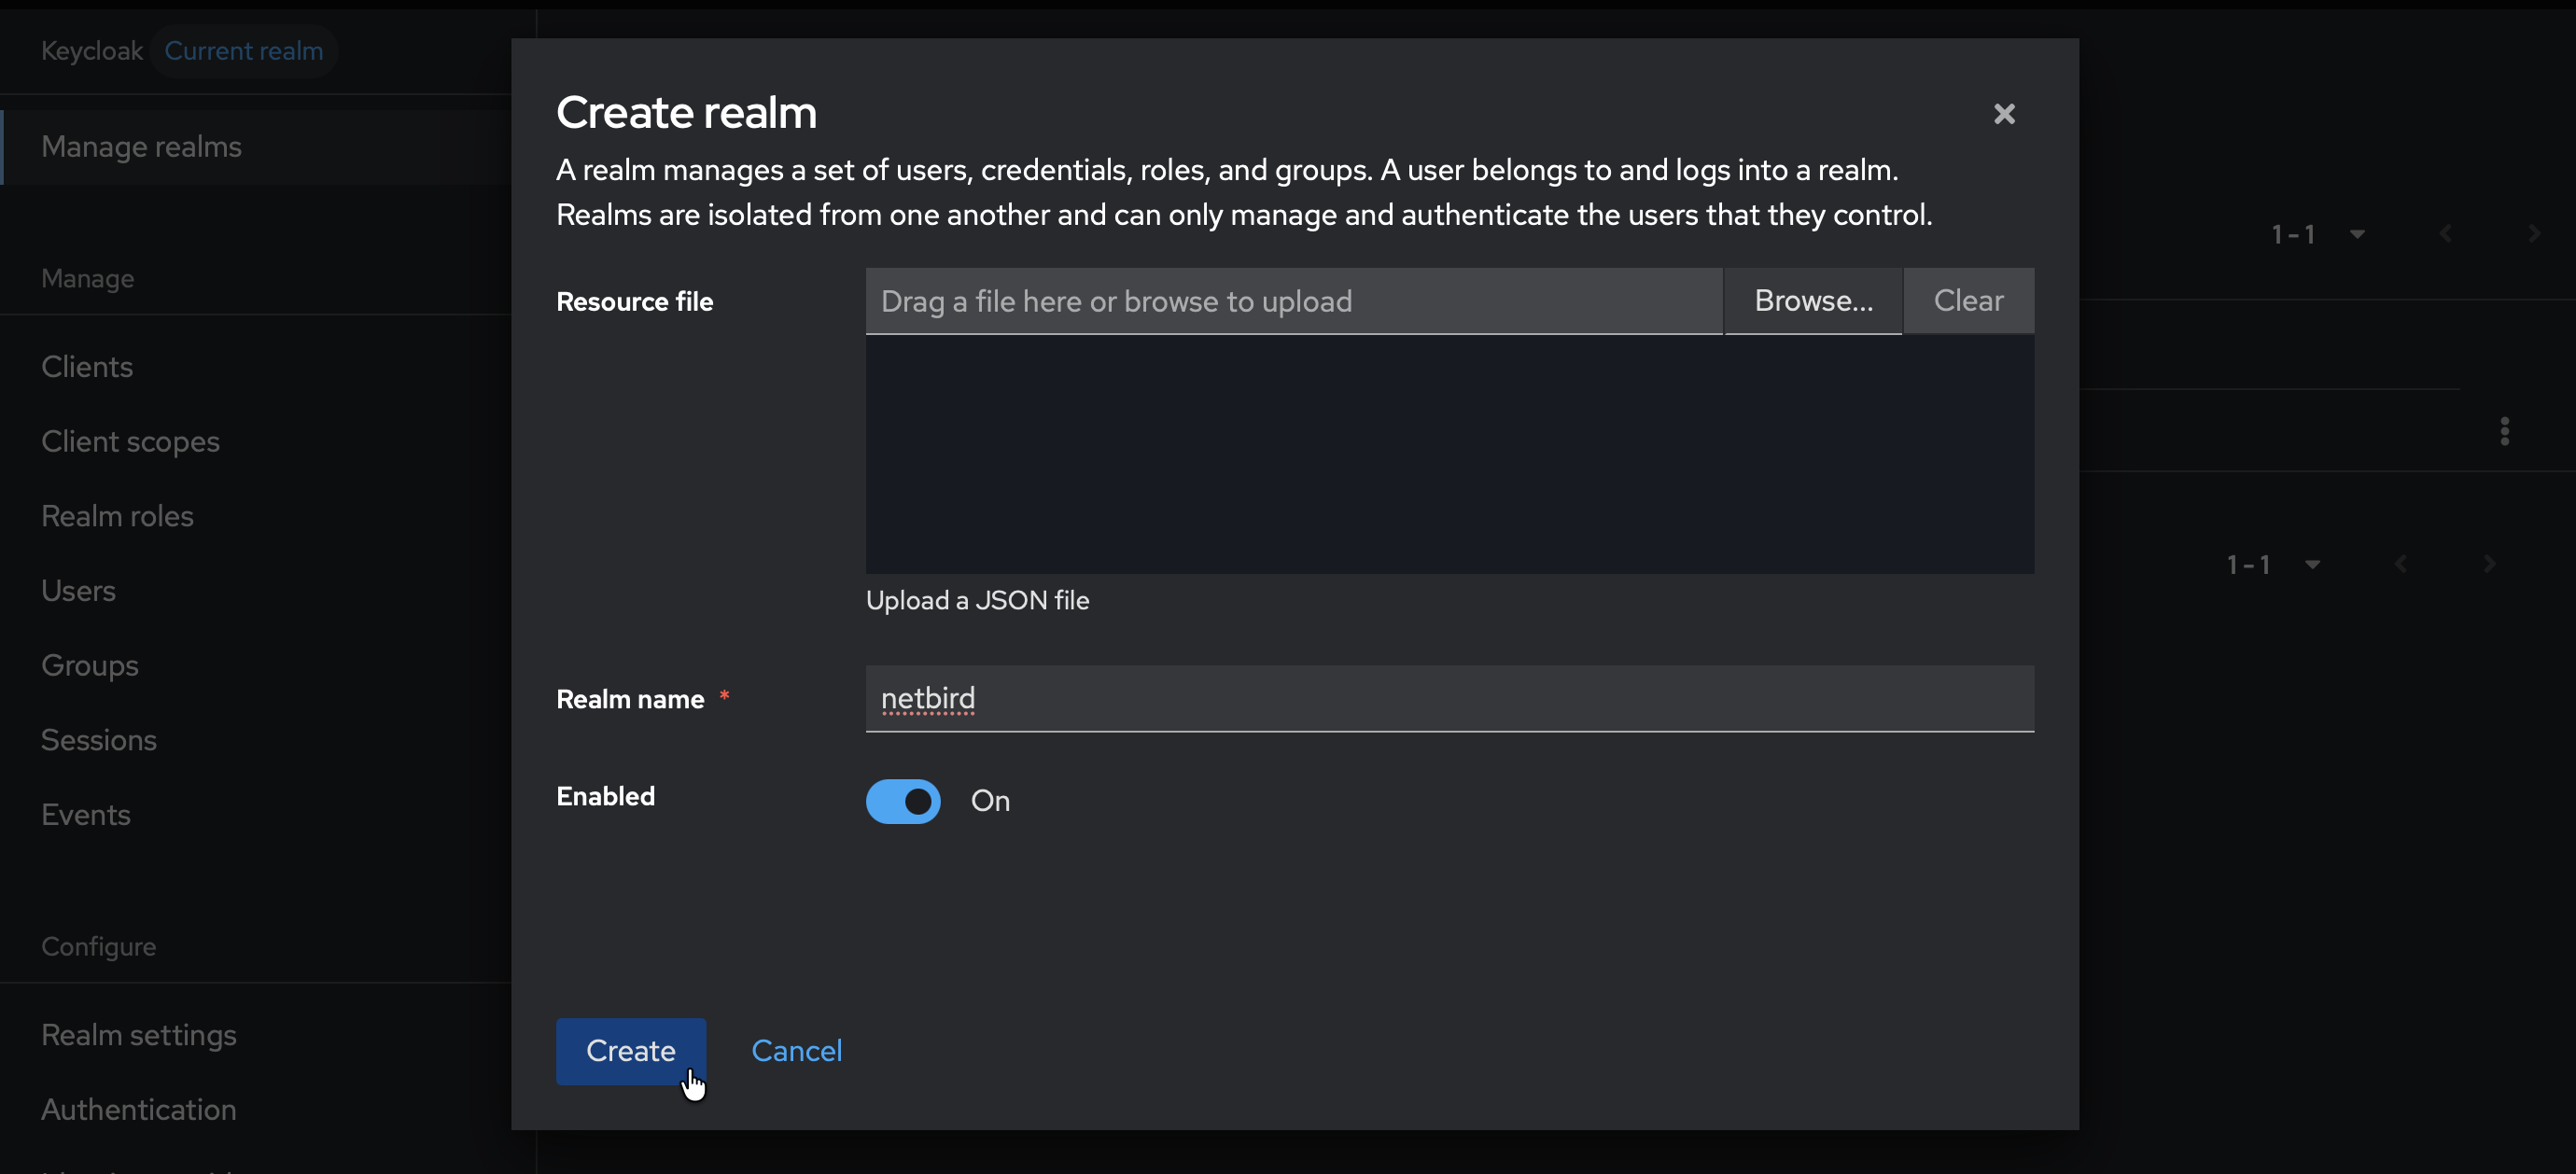
- Click Create
- Verify that
openzrois now selected in the realm dropdown
Step 2: Create User in Keycloak
- Make sure the
openzrorealm is selected - Click Users (left-hand menu)
- Click Create new user
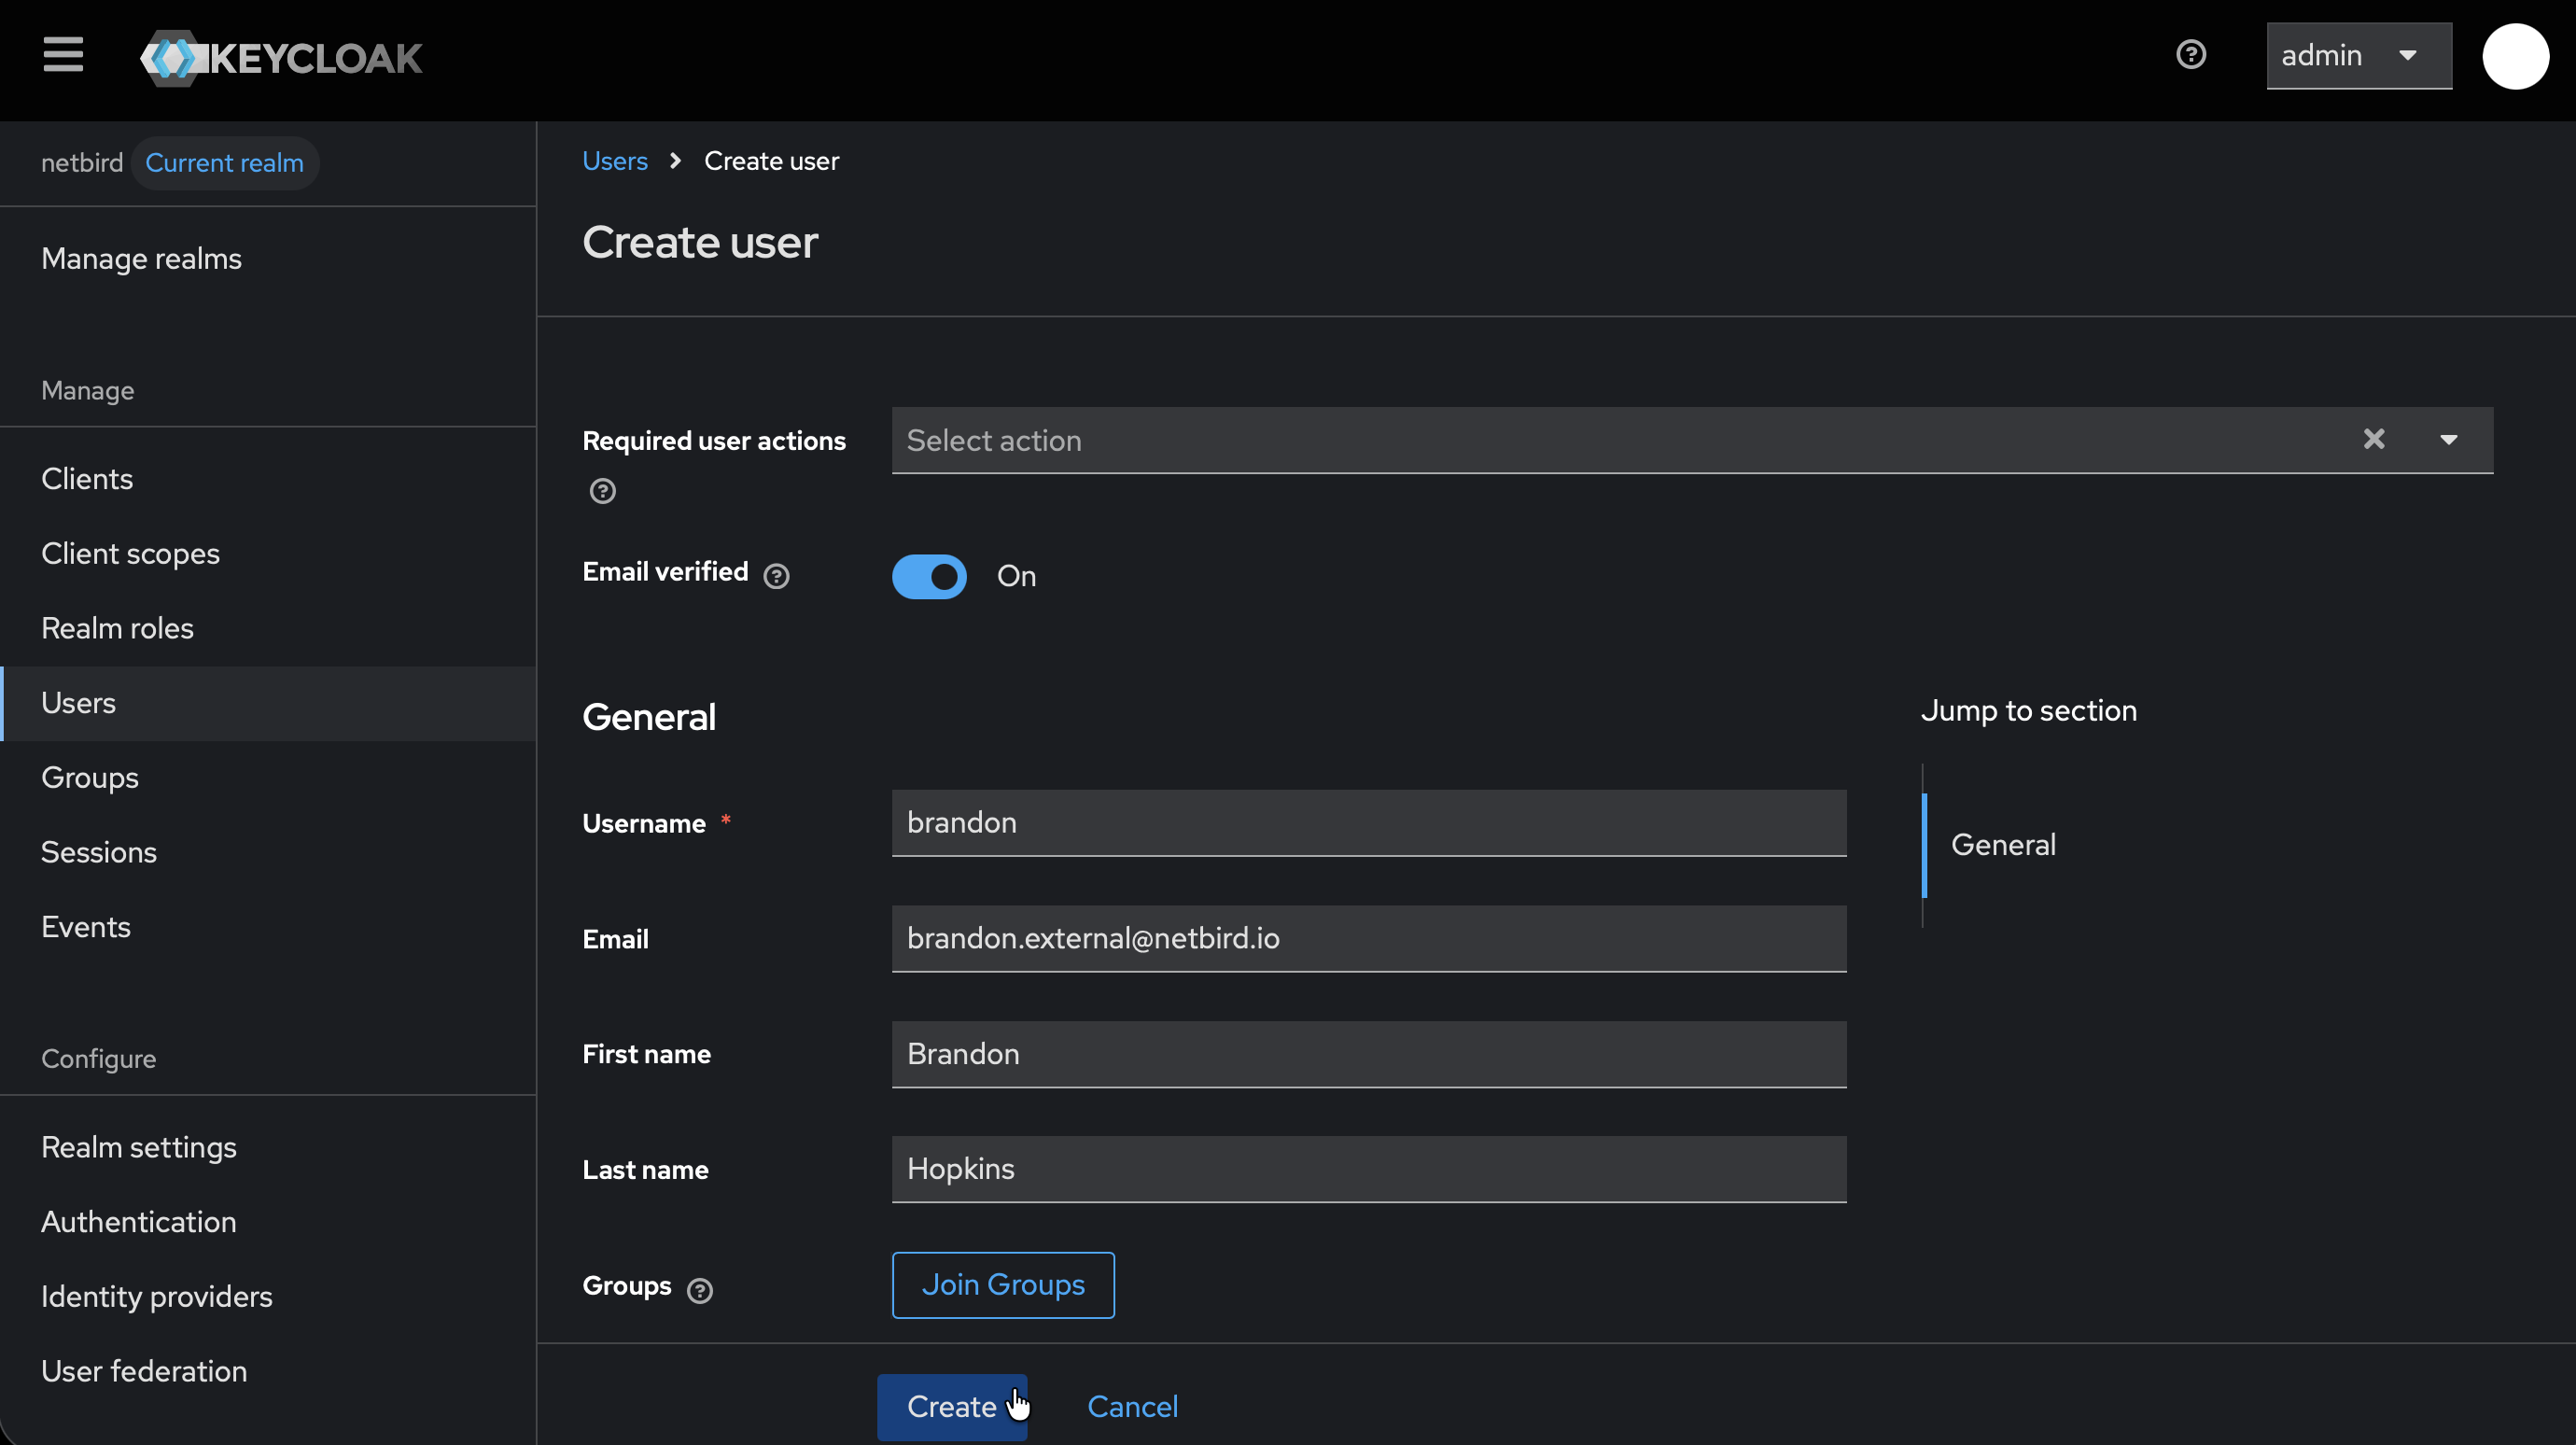
- Fill in:
- Username:
openzro(or your preferred username) - Email: Your email address
- Username:
- Click Create
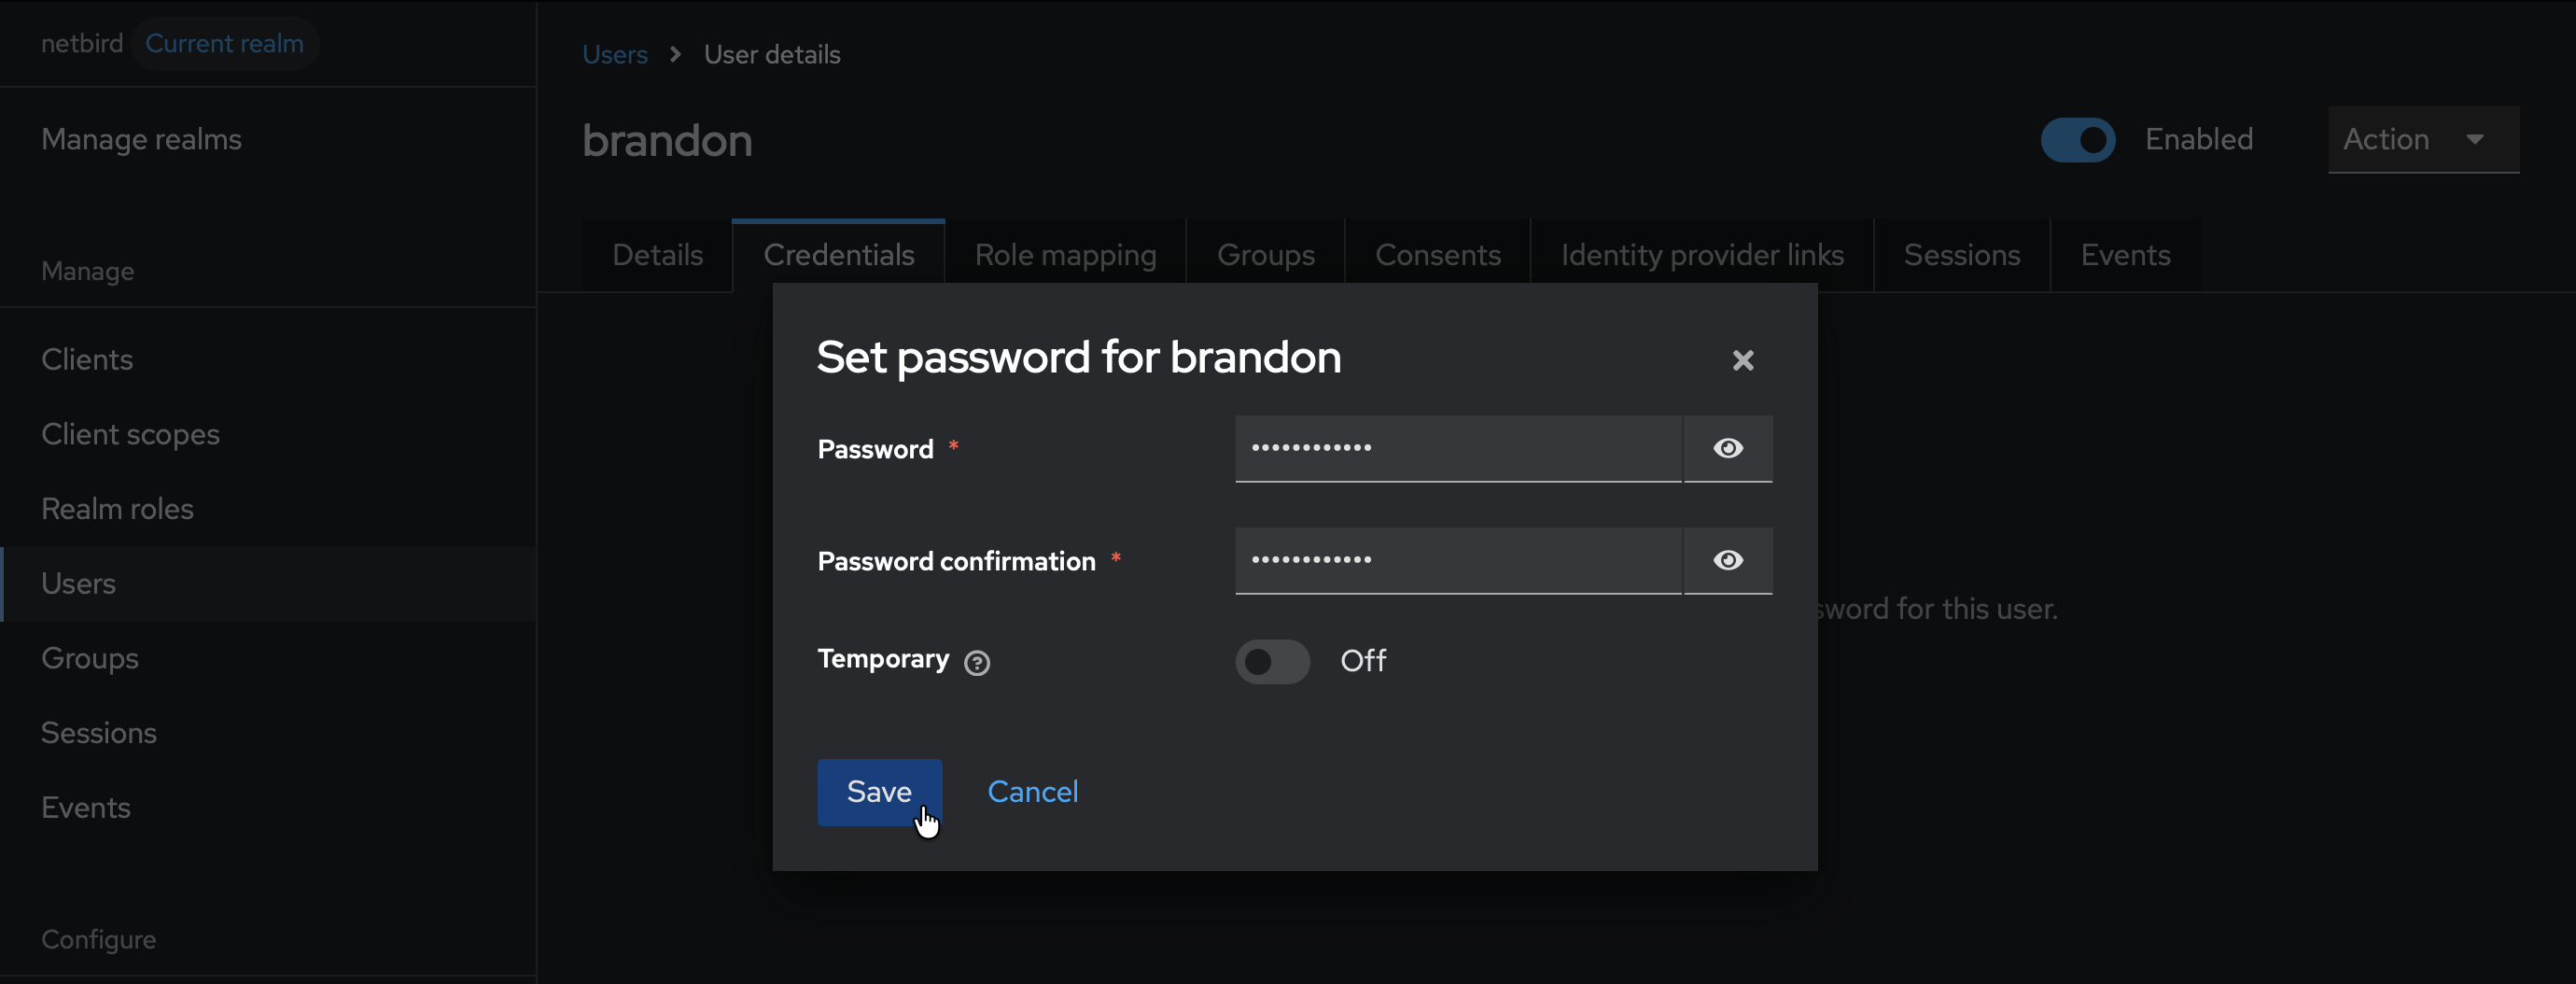
- Click the Credentials tab
- Click Set password
- Fill in the password and set Temporary to
Off - Click Save
Step 3: Start Creating Client in Keycloak
- Click Clients → Create client
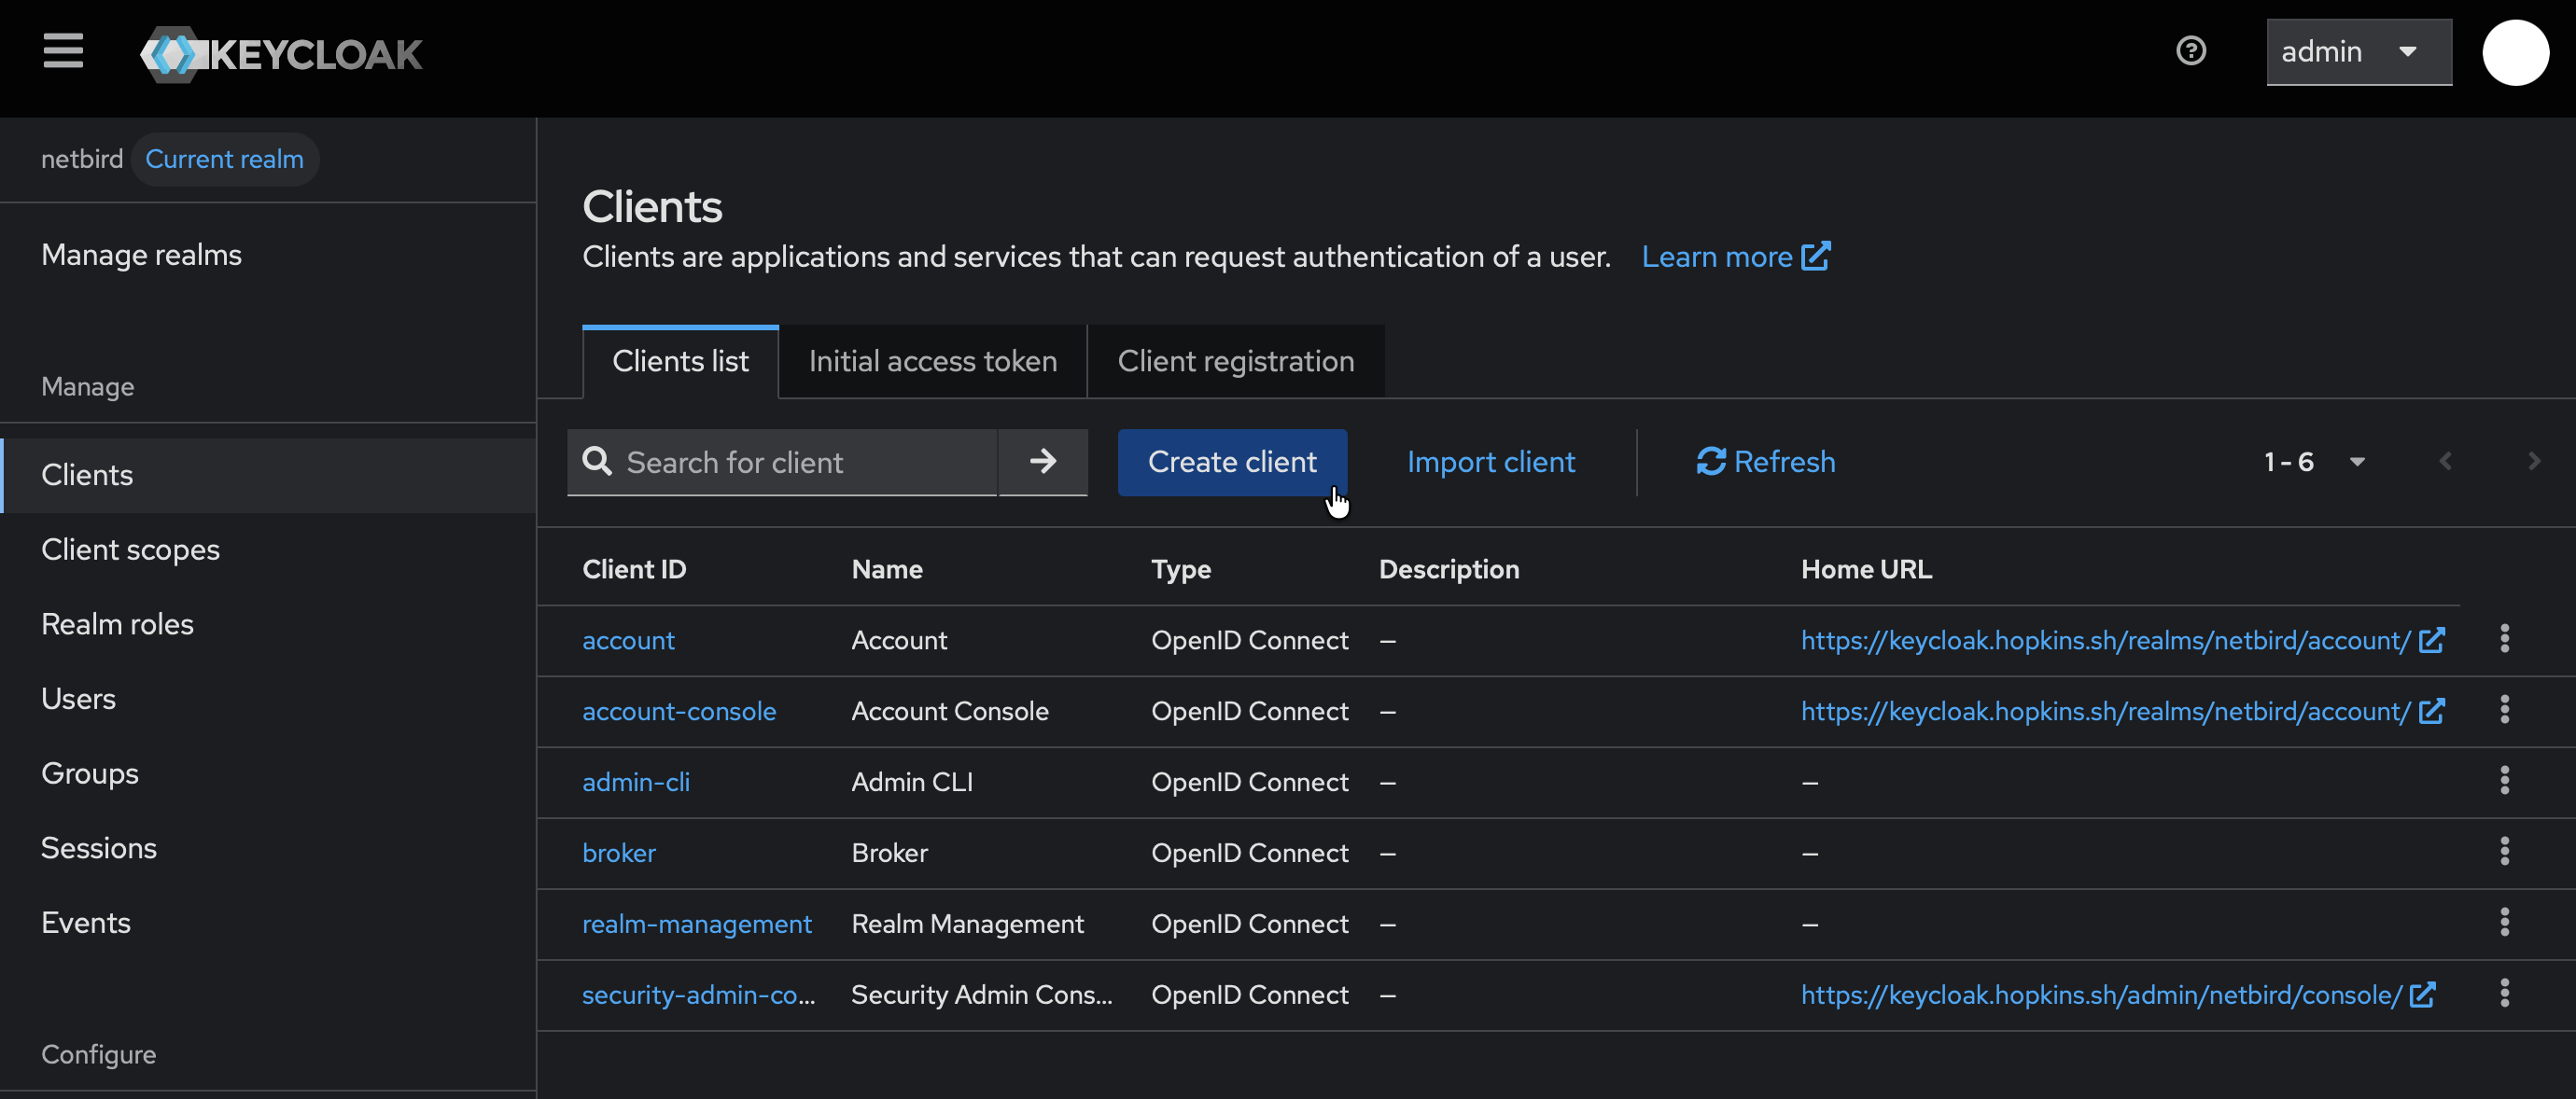
- Fill in the form:
- Client type:
OpenID Connect - Client ID:
openzro
- Client type:
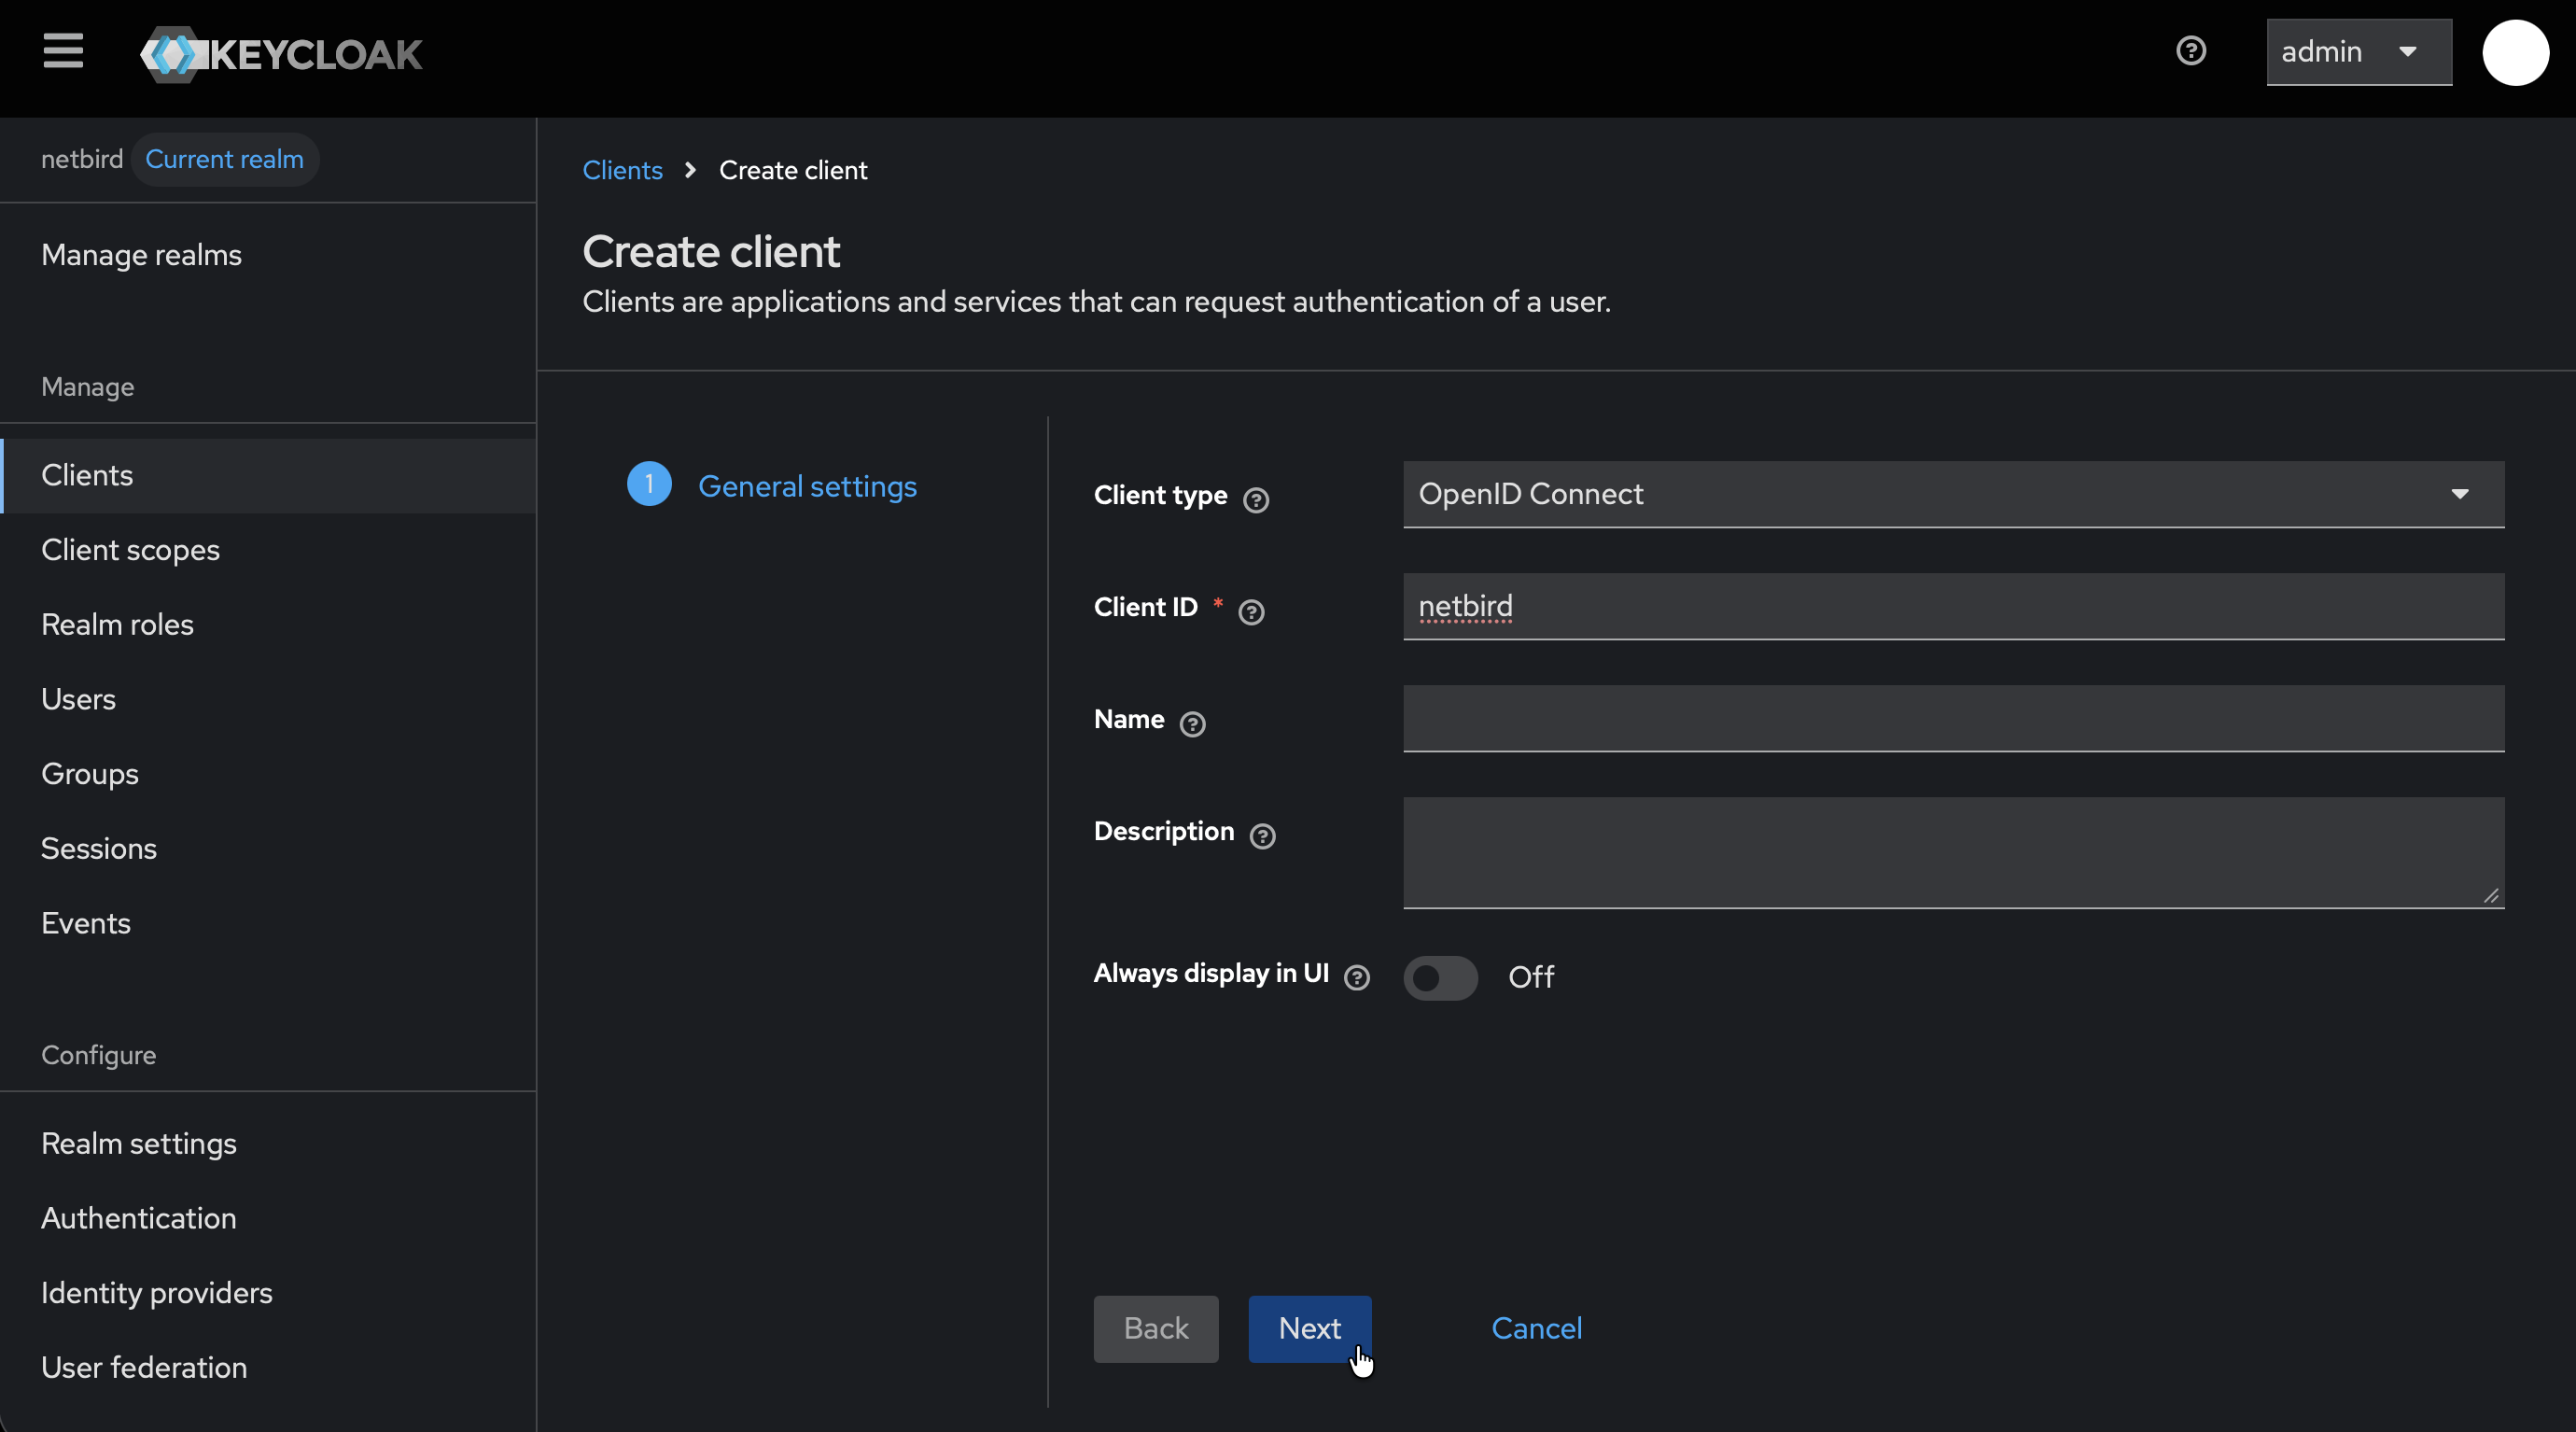
- Click Next
- On Capability config:
- Enable Client authentication
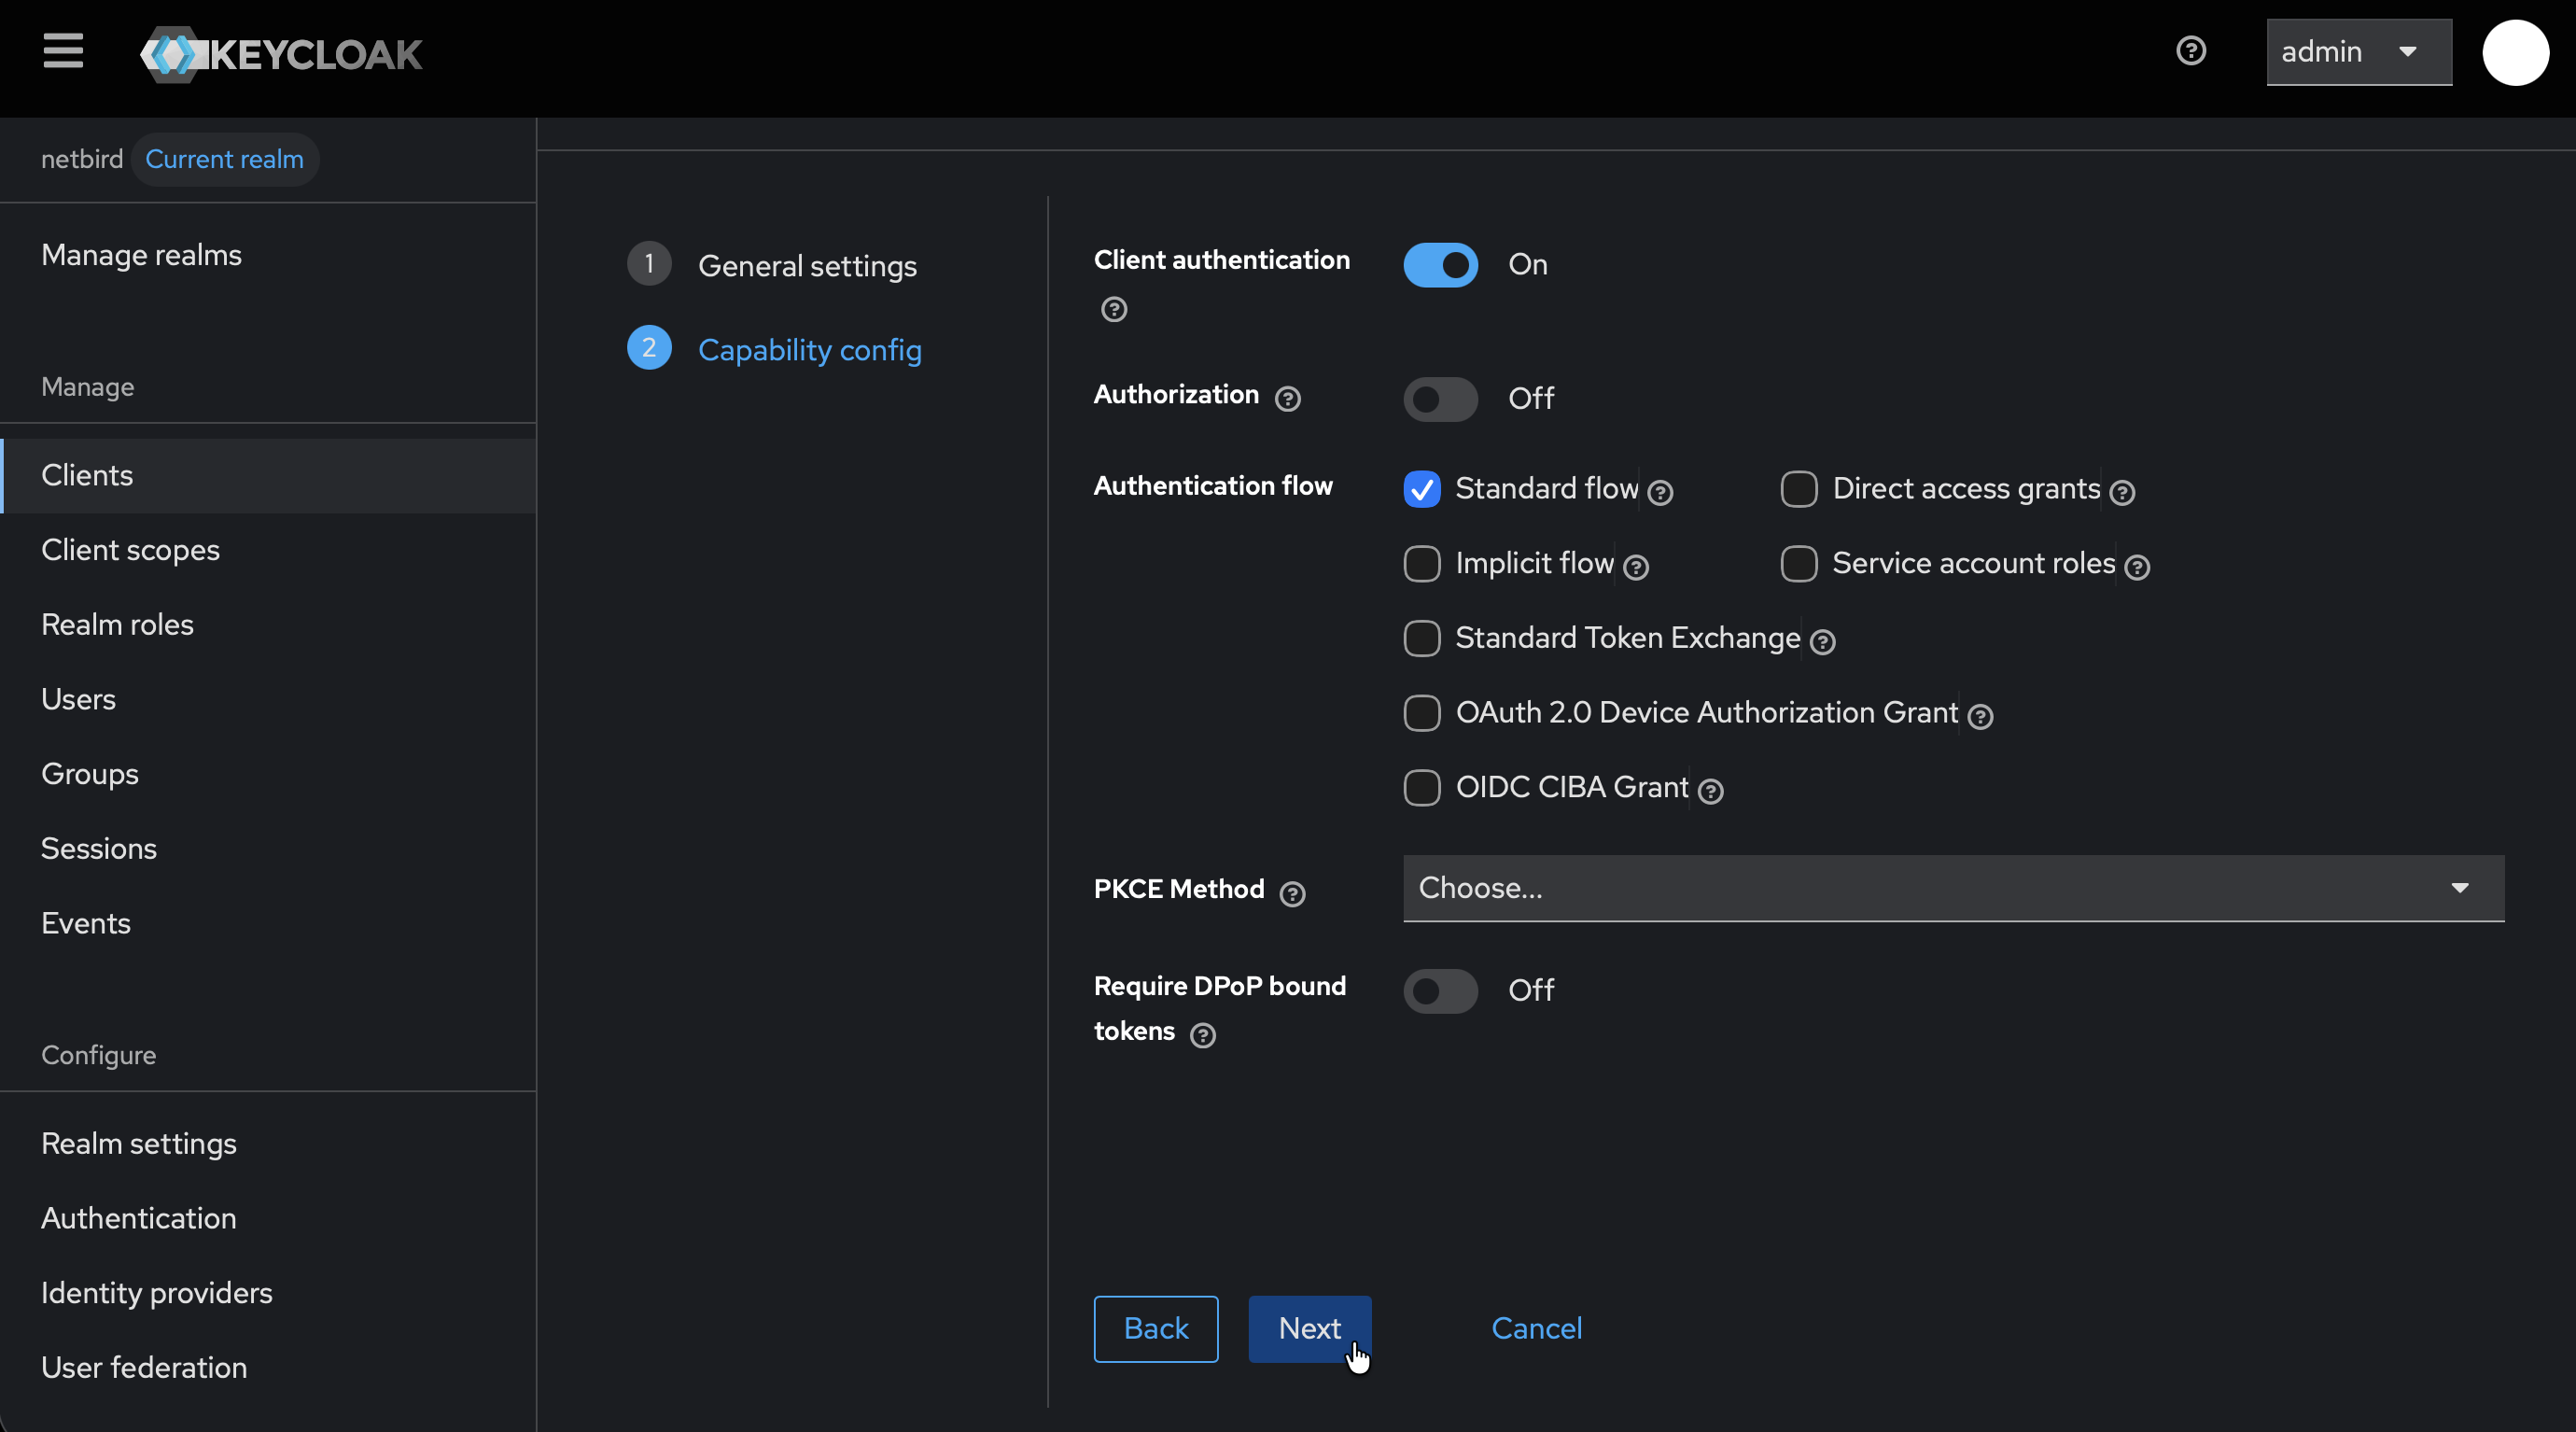
- Click Next
- On Login settings page, don't click Save yet — you'll add the redirect URI in Step 4
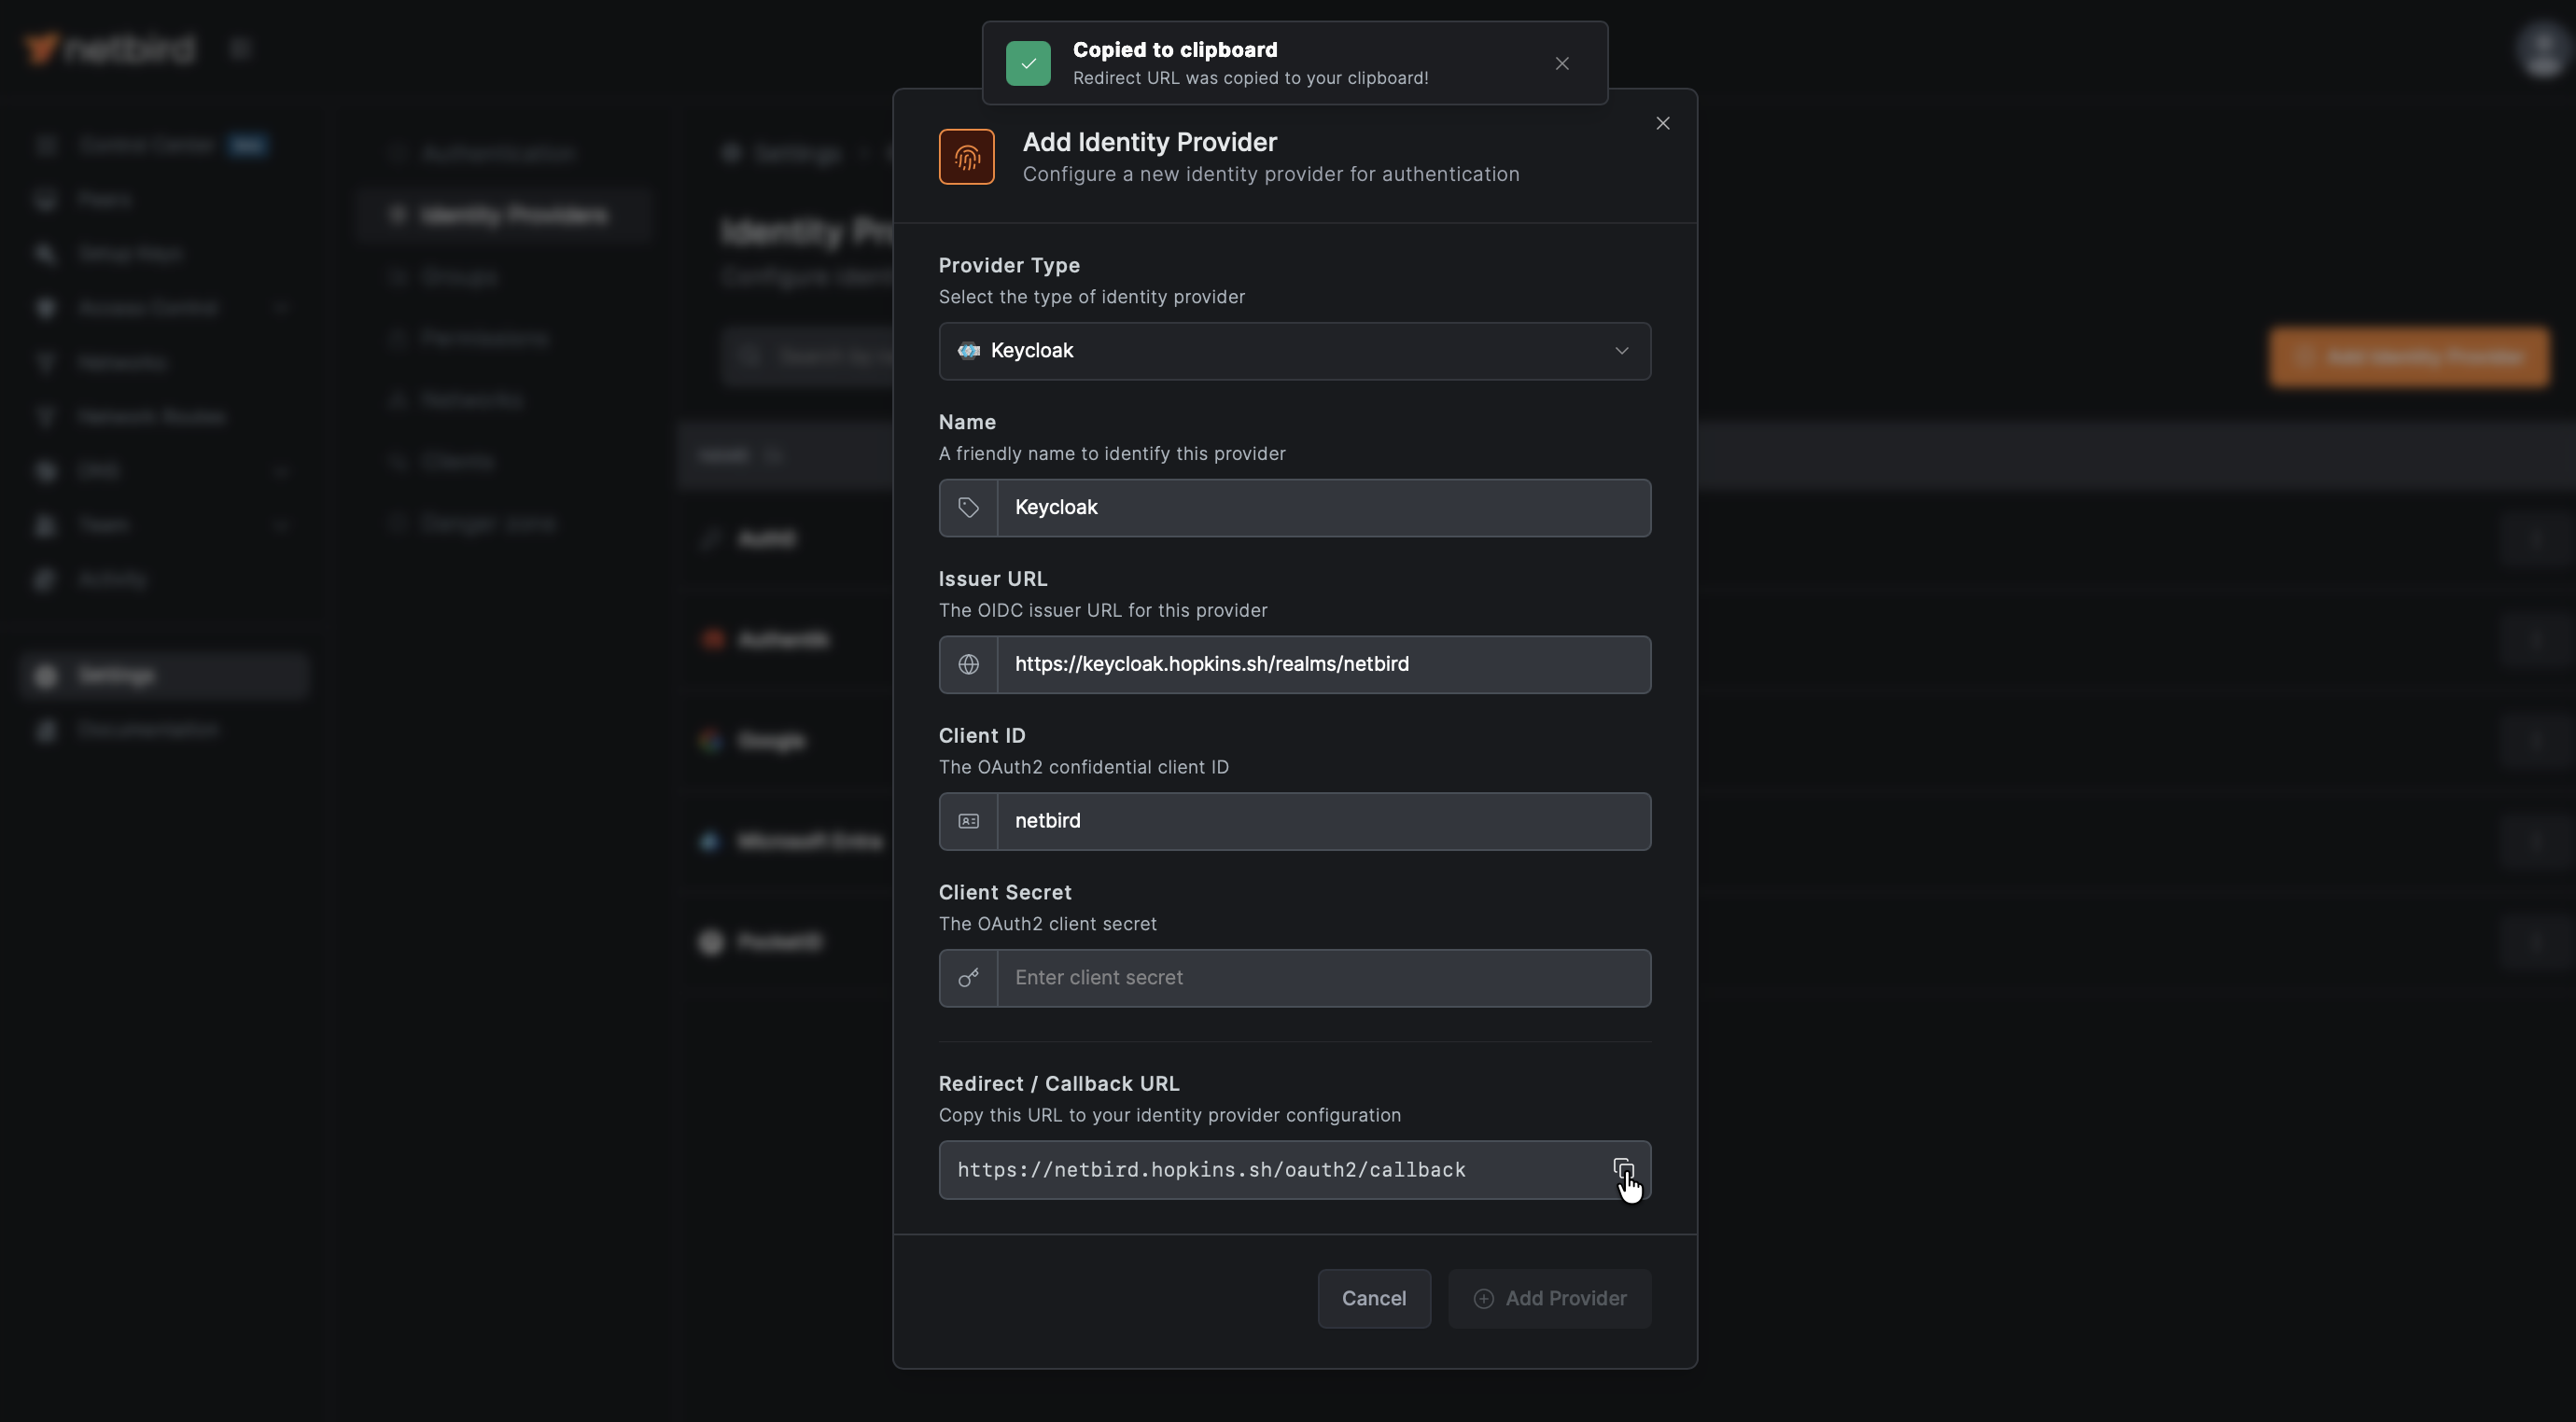
Step 4: Get Redirect URL from openZro
- Open a new tab or window and log in to your openZro Dashboard
- Navigate to Settings → Identity Providers
- Click Add Identity Provider
- Select Keycloak (or choose Generic OIDC if Keycloak is not listed)
- Fill in the fields (you can leave Client Secret empty for now):
| Field | Value |
|---|---|
| Type | Generic OIDC (if not already selected) |
| Name | Keycloak (or your preferred display name) |
| Client ID | openzro (from Step 3) |
| Client Secret | Leave empty for now |
| Issuer | https://keycloak.example.com/realms/openzro |
- openZro will display a Redirect URL — copy this URL (but don't click Add Provider yet)
Step 5: Complete Client Configuration in Keycloak
- Return to the Keycloak Admin Console tab
- On the Login settings page:
- Under Valid redirect URIs, paste the redirect URL you copied from openZro
- Click Save
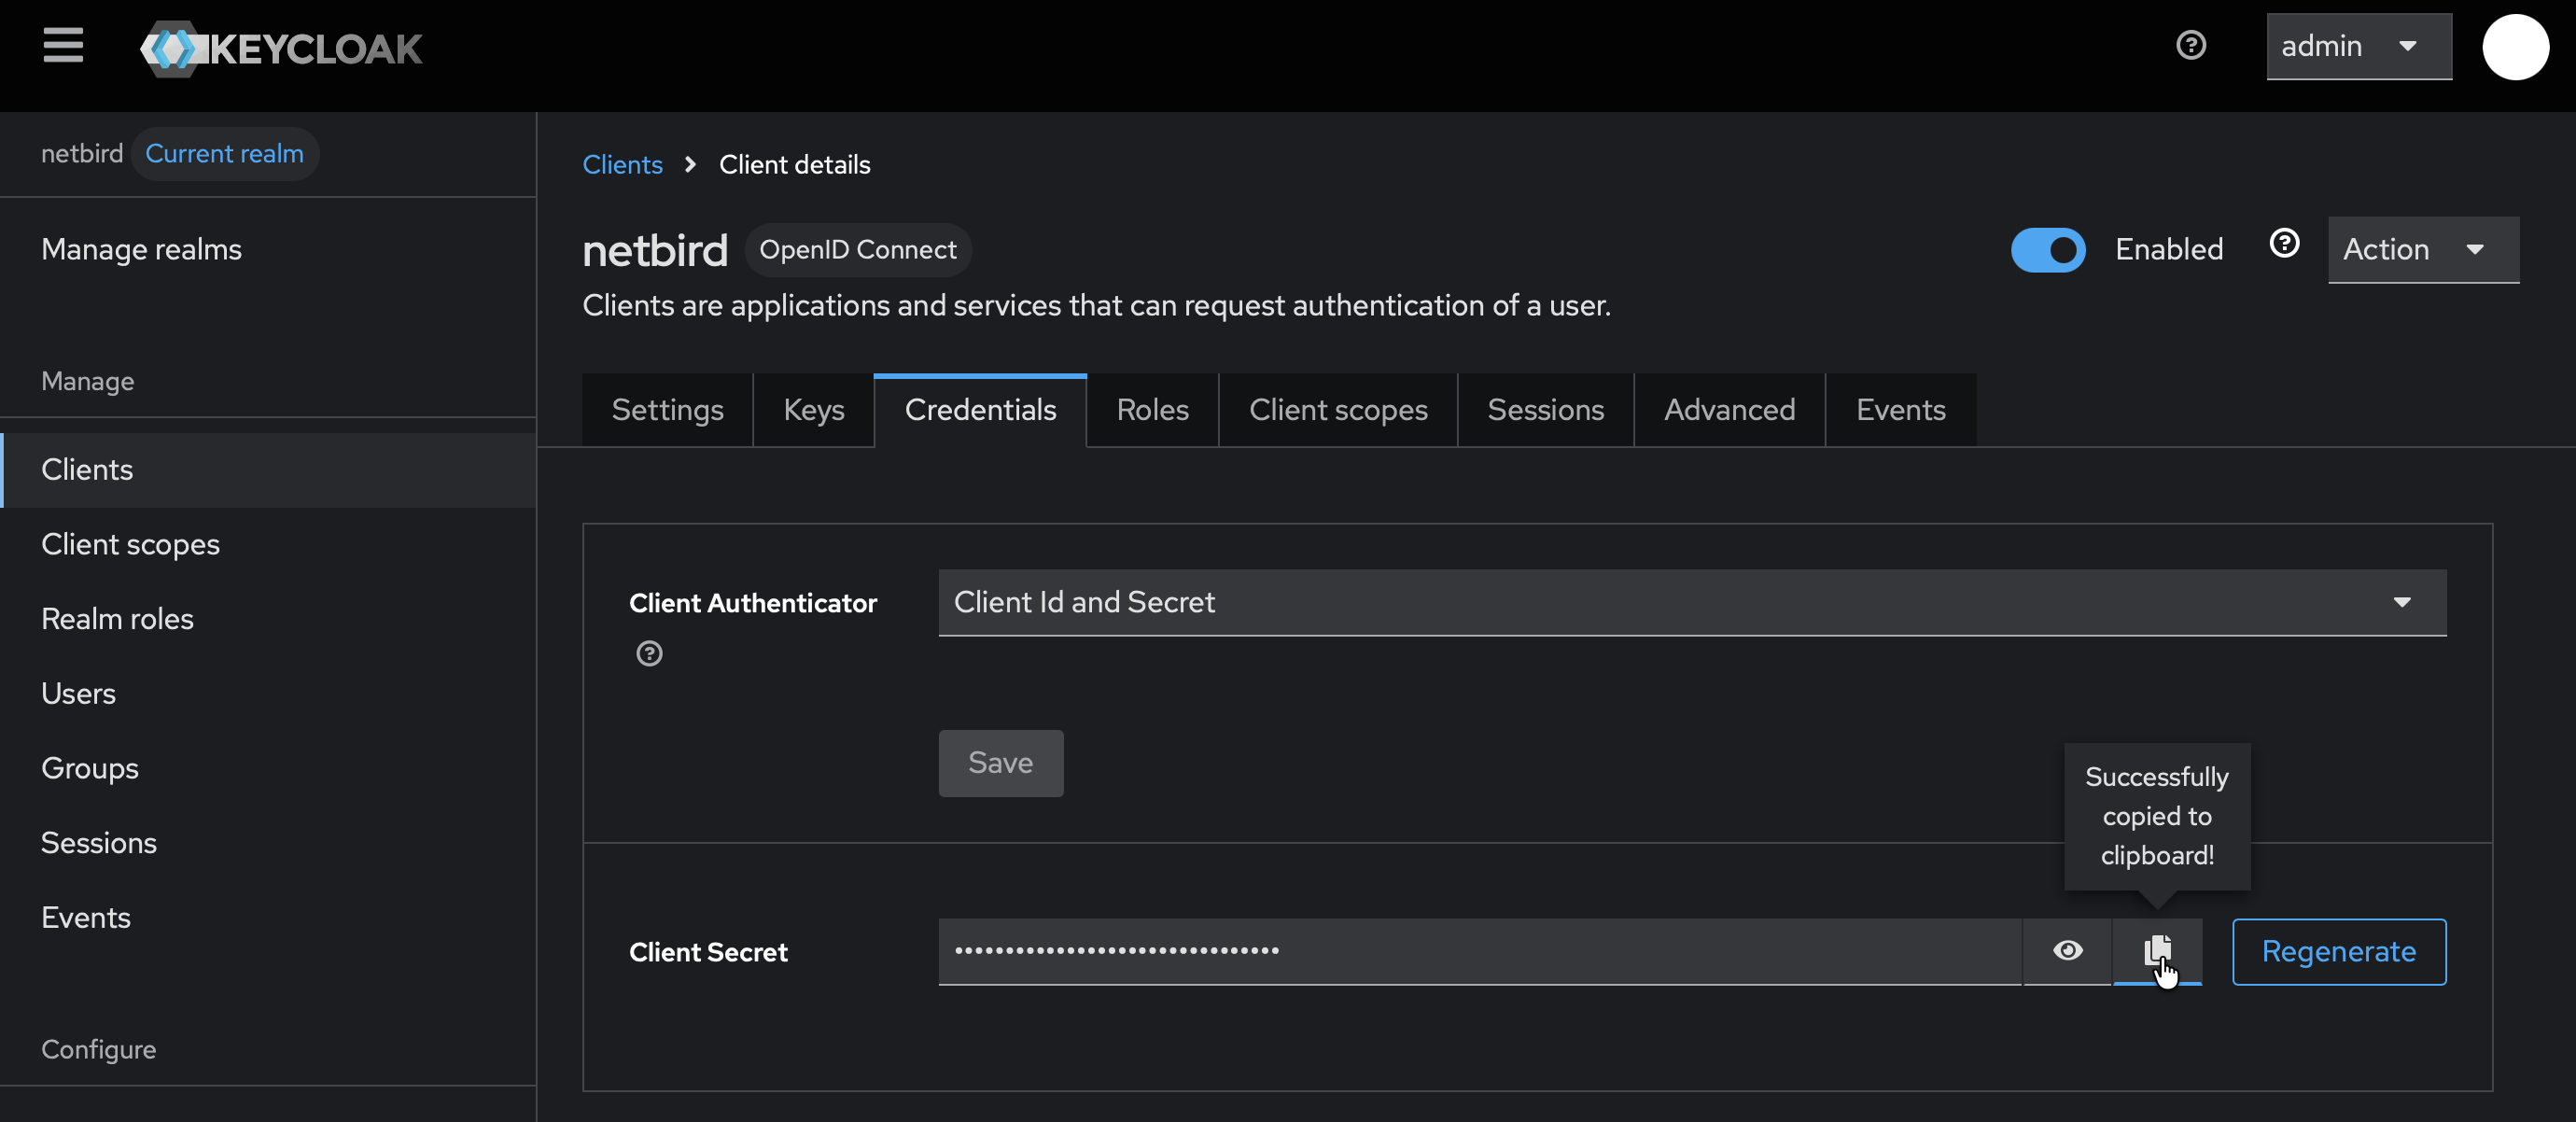
- Go to the Credentials tab and copy the Client secret — you'll need this for Step 6
Step 6: Complete openZro Setup
- Return to the openZro tab
- In the identity provider form, paste the Client secret you copied from Step 5
- Click Add Provider

Step 7: Test the Connection
- Log out of openZro Dashboard
- On the login page, you should see a "Keycloak" button
- Click it and authenticate with the user credentials you created in Step 2
- You should be redirected back to openZro and logged in

Users who authenticate via Keycloak will appear in your openZro Users list with a Keycloak badge next to their name.
Configuring JWT 'groups' Claim
To sync Keycloak groups with openZro, you need to create a client scope with a group membership mapper.
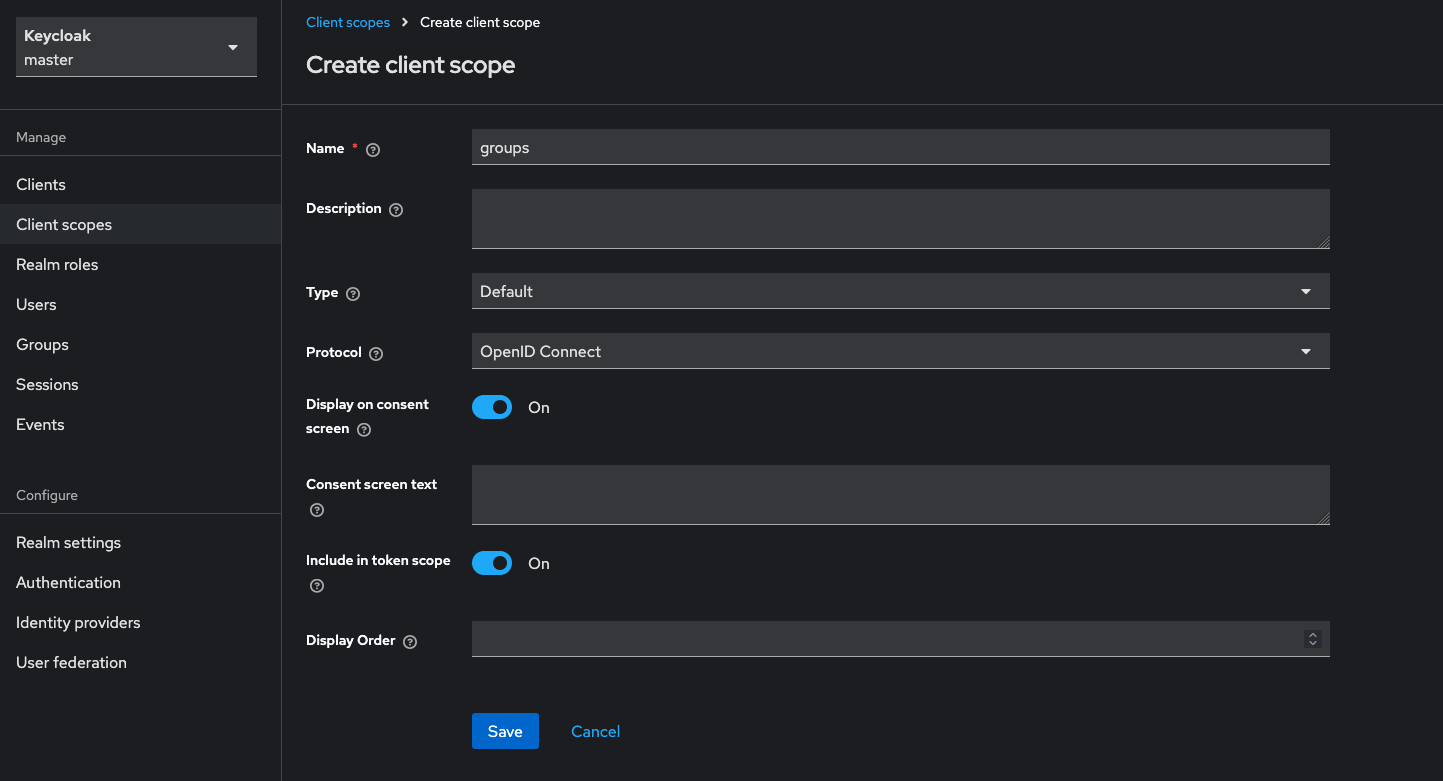
Step 1: Create Groups Client Scope
- In Keycloak Admin Console, ensure the
openzrorealm is selected - Go to Client scopes → Create client scope
- Fill in:
- Name:
groups - Type:
Default - Include in token scope:
On
- Name:
- Click Save
Step 2: Add Group Membership Mapper
- In the newly created
groupsclient scope, go to the Mappers tab - Click Configure a new mapper
- Select Group Membership
- Configure the mapper:
- Name:
groups - Token Claim Name:
groups - Full group path:
Off(recommended for cleaner group names) - Add to ID token:
On - Add to access token:
On - Add to userinfo:
On - Add to token introspection:
Off
- Name:
- Click Save

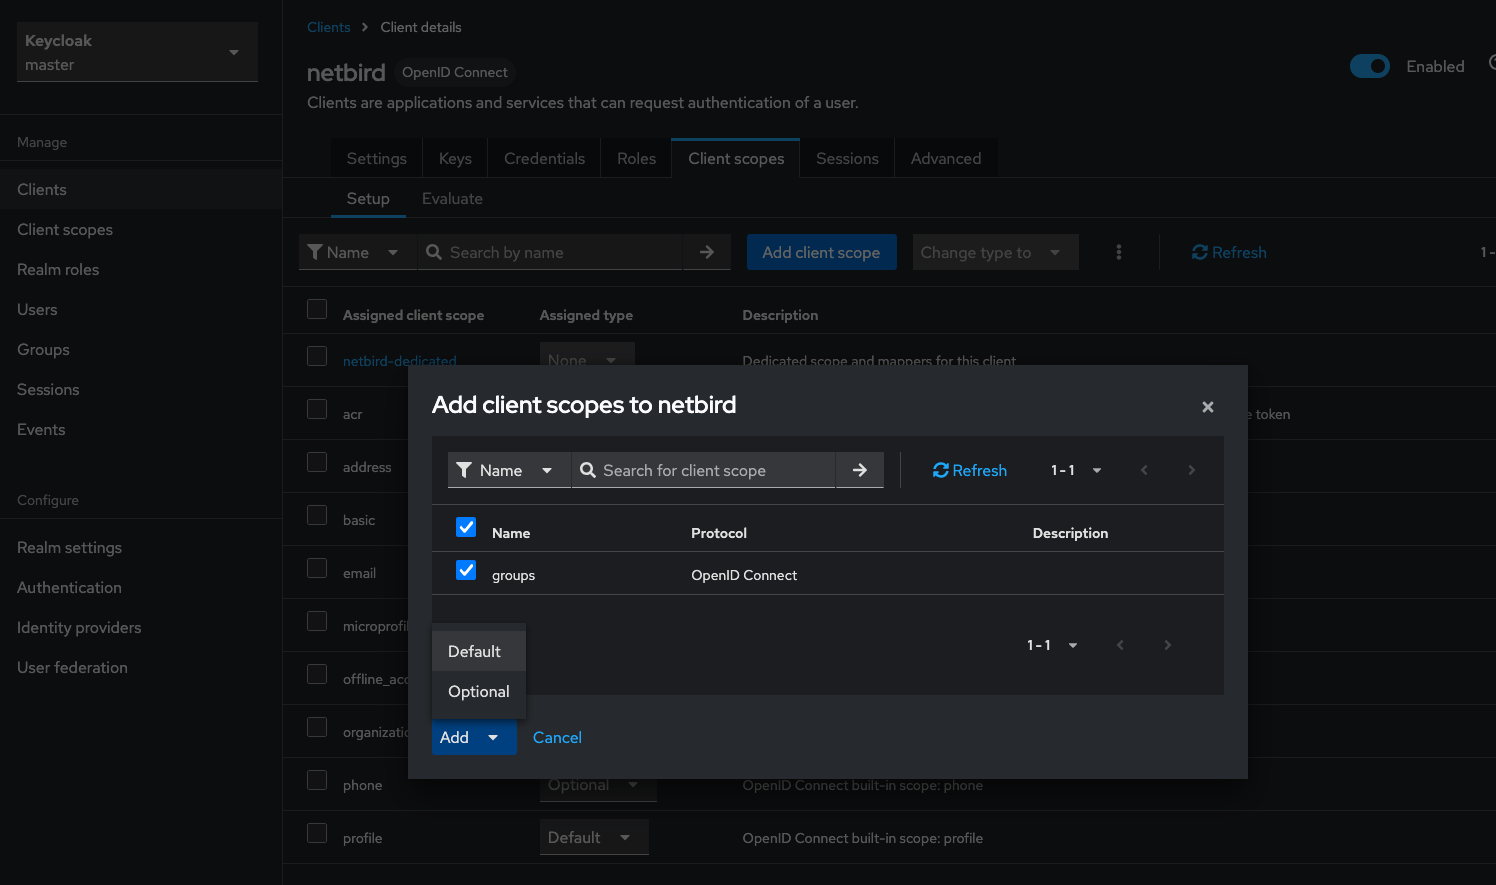
Step 3: Add Client Scope to openZro Client
- Go to Clients → openzro (your client)
- Go to the Client scopes tab
- Click Add client scope
- Select groups and add it as Default
Step 4: Create Groups and Assign Users
- Go to Groups → Create group
- Create groups as needed (e.g.,
admins,developers) - Go to Users → select a user → Groups tab
- Click Join Group and assign users to groups
Step 5: Enable JWT Group Sync in openZro
- In openZro Dashboard, go to Settings → Groups
- Enable JWT group sync
- Set JWT claim to
groups - Optionally configure JWT allow groups to restrict access
If Full group path is enabled, group names will include the path (e.g., /admins or /parent/child). Disable it for cleaner names like admins.
Step 6: Verify the dashboard requests the groups scope
groups scopeJWT Group Sync only fires if the JWT actually carries groups. On
Kubernetes deployments, the chart's dashboard.env.AUTH_SUPPORTED_SCOPES
must include groups and dashboard.env.OPENZRO_TOKEN_SOURCE must
be idToken — Dex puts groups in the id_token only, never in
the access_token. The
Helm Quickstart
spells out the four moving parts.
For Docker Compose deploys, set in setup.env:
OPENZRO_AUTH_SUPPORTED_SCOPES="openid profile email offline_access groups"
OPENZRO_TOKEN_SOURCE="idToken"
After updating either, log out + log back in fresh. Browser session caches the old (group-less) token until you re-authenticate.
Troubleshooting: groups visible in Dex log but not in dashboard
Check the Dex pod log on a fresh login. A successful upstream sync looks like:
level=INFO msg="login successful" connector_id=keycloak ...
  groups="[admins developers ...]"
If groups=[] despite Keycloak emitting them in the id_token (verify
via a direct password-grant curl against
/realms/<realm>/protocol/openid-connect/token), the Dex OIDC
connector likely has getUserInfo: true. With that enabled, Dex
calls Keycloak's /userinfo endpoint after the token exchange and
overwrites the claims — and the userinfo response does not carry
groups by default. Set getUserInfo: false and insecureEnableGroups: true
on the connector and restart the Dex pods.
If groups appears in the Dex log but not in Team → Groups, the
likely missing piece is the dashboard requesting the groups scope
(Step 6 above) — without it, Dex omits the claim from the id_token
even though the upstream returned them.
Standalone Setup (Advanced)
The standalone setup wires Keycloak as openZro's only identity provider — Dex is disabled and the management daemon talks directly to Keycloak for both token validation and user lifecycle. Choose this path only if all three apply:
- Keycloak is the source of truth for user lifecycle. You want openZro to call Keycloak's admin API to list, invite, and delete users — so deleting a user in openZro removes them from Keycloak too. The recommended setup above only consumes tokens; it cannot write back.
- You need just one IdP, and it's Keycloak. The standalone path doesn't support multiple upstreams — there's no Dex to aggregate them.
- You're willing to give up the bootstrap admin fallback. No embedded local user store. If Keycloak is down or misconfigured, nobody can log into the dashboard.
For everyone else — multi-IdP shops, anyone wanting a static admin fallback, or operators who only need authentication (not user lifecycle writeback) — stick with the Management Setup (Recommended) above.
For detailed standalone instructions, see Keycloak SSO with openZro Self-Hosted (Advanced).
If you prefer not to self-host an Identity and Access Management solution, you could use a managed alternative like Auth0.
Troubleshooting
"Invalid redirect URI" error
- Ensure the redirect URI matches exactly what's configured
- Use the exact URL from the openZro success modal
"Invalid token" errors
- Verify the issuer URL includes
/realms/openzro(or your realm name) - Ensure the client ID matches in both Keycloak and openZro
- Check clock synchronization between servers
Users not appearing in openZro
- Users appear after their first successful login